
Ducati Diavel Owners Manual: Maintenance indicator
This function indicates that the vehicle is about to or has travelled a distance for which an authorised ducati service centre should be contacted to have the general maintenance or oil change performed.
Maintenance table
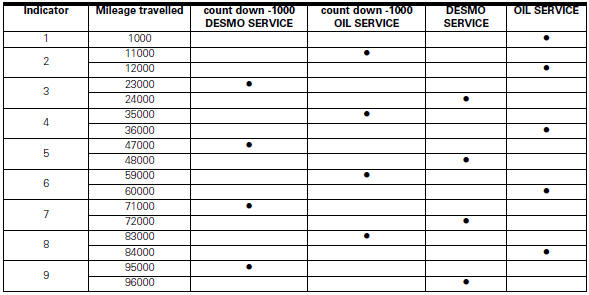
First warning - oil service 1000 km
The first warning is activated at 1000 km (600 miles) of odometer reading.
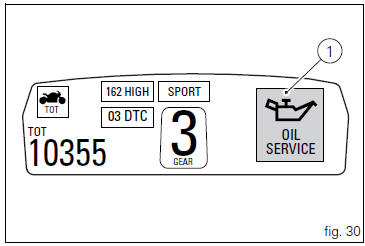
The (red) warning is activated as a large icon for 10 seconds upon every key-on (1, fig. 30) Then as a small warning that remains displayed (2, fig. 31) Until it is reset.
 Warning
This message can only be reset by the ducati dealer or authorised service centre that performs the maintenance.

 Riding style function (riding style change)
This function changes the motorcycle riding style.
Each riding style is associated with a different intervention
level of the traction control (dtc - ducati traction control)
and different engine ...
 Residual range indication when the service is due
After resetting the first oil service warning (triggered at
1000 km), upon every key-on the system displays the
indication of which type of service should be performed next
(oil service or desmo se ...
Other materials:
Dashboard menu option scrolling not possible
Fault codes
Dds: no fault code displayed
Dashboard: no fault code displayed
Location of connections and components
Location of left hand handlebar switchgear set connection.
Pin numbering for wiring harness side dashboard connector. ...
Moving off
Disengage the clutch by squeezing the clutch lever.
Push down the gear change lever firmly with the tip of
your foot to engage first gear.
Raise the engine revs by turning the throttle twistgrip
while gradually releasing the clutch lever. The motorcycle
will start moving.
Release the ...
General maintenance indications
Useful tips
Ducati recommends that you follow the instructions below in order to prevent
problems and obtain the best end result:
When diagnosing faults, primary consideration should always be given to
what the customer reports about motorcycle
operation since this information can highli ...