
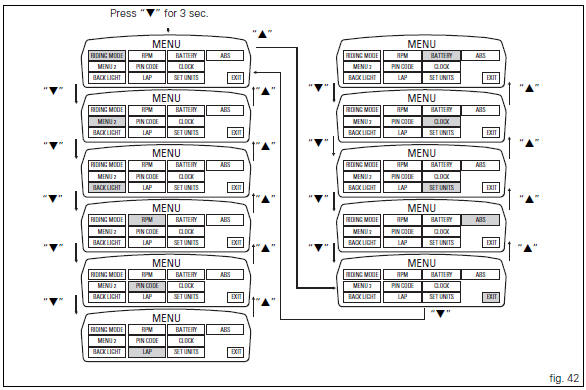
Ducati Diavel Owners Manual: Setting menu
This menu is used to enable/disable and set some motorcycle functions.
To access the "setting menu" press the button (2, fig. 14)
? for 3 seconds.
 Note
Note
When within this menu no other function can be displayed.
 Important
For safety reasons, the setting menu can only be accessed when motorcycle speed is lower than or equal to 20 km/h. If this menu is open and the speed of the motorcycle exceeds 20 km/h, the instrument panel automatically exits the menu and returns to the "main" display.
The setting menu contains the following "items":
- Riding mode
- Menu 2
- Back light
- Rpm
- Pin code
- Lap
- Battery
- Clock
- Set units
- Abs
- Exit
To quit the setting menu, use button (1, fig. 14) ?
 or
or
button (2, fig. 14) ? to select the
"exit" indication and
press the reset button (12, fig. 12).
 Instrument panel diagnosis
This function identifies any abnormal vehicle behaviours.
The instrument panel activates any abnormal vehicle
behaviours in real time (errors).
At key-on (at the end of the check) one or more & ...
 Riding mode customisation
This function customises each riding style.
To access the function it is necessary to view the "setting"
menu page 48, using button (1, fig. 14) ?
or (2, fig. 14)
? select the & ...
Other materials:
Hands free system key-on and key-off
Key-on consists in turning on the hands free system and all
of its electronic devices.
Key-off consists in turning off the hands free system and all
electronic devices, and makes sure the engine is turned off.
Key-on is done using the button (6) on the handlebar on the
right switch or using ...
Removal of the fuel tank filler cap
Remove tank covers (sect. 5 - 2, Removal of the fuel tank fairings).
Remove hoses (8) and (15) from the filler cap assembly (10).
Open the filler cap.
Unscrew the outer screws (17) securing the ring nut to the filler cap recess.
Remove the filler cap assembly (10).
...
Overhauling the front forks
Note
It is advisable to loosen the top cap (14) when the fork is still fitted
to the motorcycle.
Note
The specific tools for the revision of the fork, are described in sect. 3
- 4, Specific tools for the frame.
Loosen the spring preload adjuster before unscrewing the plug (14).
Unscrew th ...