
Ducati Diavel Owners Manual: Adjusting the front fork
The front fork used on this motorcycle has rebound, compression and spring preload adjustment.
The settings are adjusted using external adjuster screws.
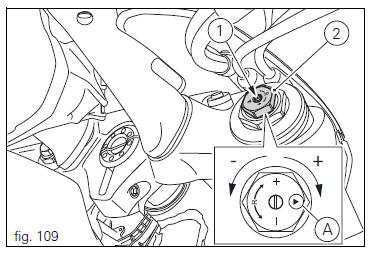
- To adjust rebound damping (fig. 109);
- To adjust spring preload (fig. 109);
- To adjust compression damping (fig. 110).
Park the motorcycle in a stable position on its side stand.
Turn the adjuster (1) on fork leg top with a flat screwdriver to adjust rebound damping.
Turn the adjuster (3) on fork leg bottom with a flat screwdriver to adjust compression damping.
Turn the adjusting screws (1 and 3) to adjust the dampening.
Turn the screw all the way in to set the hardest damping (position "0"). Starting from this position, turning anticlockwise, you can count the turns.
To change preload of the spring inside each fork leg, turn the hex. Adjuster (2, fig. 109) With a 22 mm hexagon wrench, starting from the fully open position (clockwise). From reference (a, fig. 109), Every full turn clockwise corresponds to 1 mm of preload of the spring, up to a maximum of 15 mm, corresponding to 3 full turns.
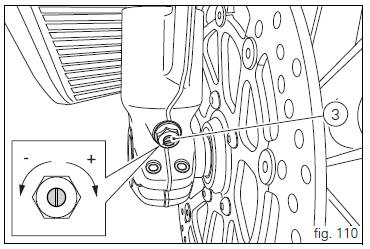
Standard settings, from fully open position, are as follows: compression: 1 and a half turns; rebound: 1 and a half turns.
Spring preload: fully open (anticlockwise).
 Important
Adjust both fork legs to same settings.
 Passenger grabhandle
Passenger grabhandle (1, fig. 107) Is located inside the tail
guard; to take it out, remove the seat (see "removal of the
seat" on page 119), pull the knob (2, fig. 107) While taking out
...
 Adjusting the rear shock absorber
The rear shock absorber has external commands that enable
you to adjust the setting to suit the load on the motorcycle.
The adjuster (1, fig. 111) Located on the lower connection
holding the shoc ...
Other materials:
Replacing of the rear sprocket
Lock the wheel axle rotation.
Remove the clip (1).
Loosen the locking nut (2) with a socket wrench.
Fully unscrew the nut (2) and remove the washer (3) and the flange (5) with the
sprocket (17).
Collect the spacer (9).
Using a mallet, tap the flange (5) with the cush drive dampe ...
Operations to be carried out by the dealer
List of operations to be performed every 12000 km / year (first
limit reached)
Reading of the error memory with dds on the engine control units,
vehicle and abs
Change the engine oil
Change the engine oil filter
Check and/or adjust valve clearance ( ...
Refitting the front brake master cylinder
Insert the front brake master cylinder unit (1) on the right side of the
handlebar to bring the terminal internal edge in
correspondence to the bolted joints (a).
Fit the terminal (12) on the handlebar inserting the screws (15).
Tighten the terminal (12) retaining screws to a torque of 10 ...