
Ducati Diavel Service Manual: Background setting function for the dashboard on tank - dashboard 1
This function allows setting the "background" of the dashboard on tank.
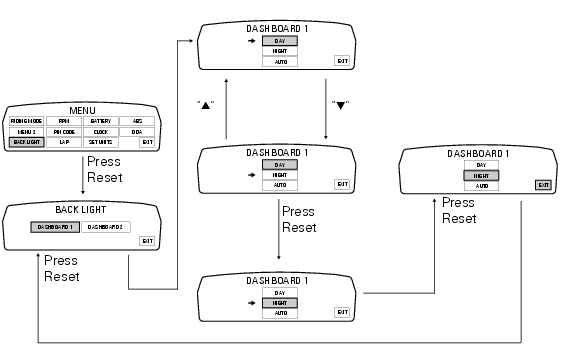
To access the function it is necessary to view the ""setting" menu", using buttons (1) "s" or (2) "t" select the "back light" function and press the reset button (3) to enter the following page.
Use button (1) "s" or (2) "t" to select the "dashboard 1" function and confirm by pressing the reset button (3).
Once you enter the "dashboard 1" function, setting is highlighted on the display (day, night or auto in green); use button (1) "s" or (2) "t" to shift the arrow to the left onto the new setting and confirm by pressing the reset button (3).
To exit the setting function, press the reset button (3) when "exit" is highlighted.
"Day" setting: dashboard background becomes permanently "white" to improve readout view - recommended with bright exterior lighting.
"Night" setting: dashboard background becomes permanently "black" for a more dimmed visibility - recommended with poor exterior lighting and/or dark.
"Auto" setting: dashboard background is set automatically according to exterior lighting conditions (detected by a sensor) and will be "black" for a more dimmed visibility with poor exterior lighting and "white" for an improved readout view with bright exterior lighting.
Note
In the event of an interruption of the power supply from the battery, when power is restored at the next key-on, the backlighting will always be set by default to "auto" mode.
 Menu 2 on/off function
This function turns off and back on the menu 2.
If menu 2 is disabled, the functions for average fuel consumption (cons.Avg),
instantaneous fuel consumption (cons.),
Average speed (speed avg), t ...
 Backlighting setting function for the dashboard on handlebar - dashboard 2
This function allows backlighting setting of the dashboard on handlebar.
To access the function it is necessary to view the ""setting" menu", using
buttons (1) "s" or (2) "t" select the "back
li ...
Other materials:
Residual range indication when the service is due
After resetting the first oil service warning (triggered at 1000 km), upon
every key-on the system displays the
indication of which type of service should be performed next (oil service or
desmo service) and the residual range.
A (green) warning (1) is activated for 2 seconds on every key-on ...
Refitting the fuel tank fairings
Make sure that the following components are fitted on the tank fairing (22):
Spacers (18);
Seals (20).
Fit the clips (19) to the central cover (22) at the positions shown,
inserting the tabs (h) into the slots (l).
Apply threadlocker to the screws (14).
Place the tank fairing (22) ...
Storing the bike away
If the motorcycle is to be left unridden over long periods, it is
advisable to carry out the following operations before storing
it away:
clean the motorcycle;
empty the fuel tank;
pour a few drops of engine oil into the cylinders through the
spark plug bores, then turn the engine over by hand ...