
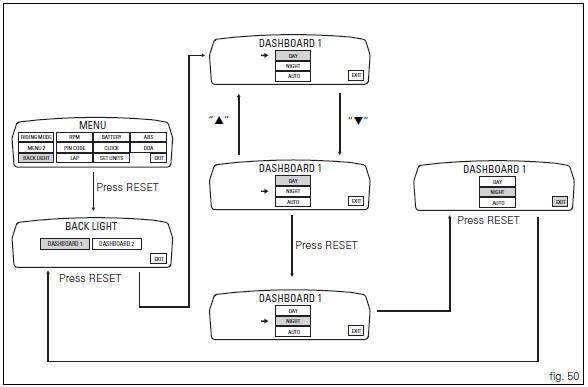
Ducati Diavel Owners Manual: Background setting function for the instrument panel on tank - dashboard 1
This function allows setting the "background" of the instrument panel on tank.
To access the function it is necessary to view the "setting" menu page 48, using
button (1, fig. 14) ?"
" or (2, fig. 14) ?" " select the "back light" function
and press the reset
button (12, fig. 12) To go to next page.
Use button (1, fig. 14) ?" " or (2,
fig. 14) ?" " to select the
"dashboard 1" function and confirm by pressing the
reset button (12, fig. 12).
Once you enter the "dashboard 1" function, setting is highlighted on the display
(day, night or auto in green); use button (1, fig. 14) ?"
" or (2, fig. 14) ?" " to shift the
arrow on the left onto the new setting and confirm by
pressing the reset button (12, fig. 12).
To exit the setting function, press the reset button (12, fig.
12) Where "exit" is highlighted.
?Gday" setting: instrument panel background becomes permanently "white" to improve readout view - recommended with bright exterior lighting.
?Gnight" setting: instrument panel background becomes permanently "black" for a more dimmed visibility - recommended with poor exterior lighting and/or dark.
?Gauto" setting: instrument panel background is set automatically according to exterior lighting conditions (detected by a sensor) and will be "black" for a more dimmed visibility with poor exterior lighting and "white" for an improved readout view with bright exterior lighting.
 Note
Note
In the event of an interruption of the power supply from the battery, when power is restored at the next key-on, the backlighting will always be set by default to "auto" mode.
 Menu 2 on/off function
This function turns off and back on the menu 2.
If menu 2 is disabled, the functions for average fuel
consumption (cons.Avg), instantaneous fuel consumption
(cons.), Average speed (speed avg), tr ...
 Backlighting setting function for the instrument panel on Handlebar -
dashboard 2
Backlighting setting function for the instrument panel on Handlebar -
dashboard 2
This function allows backlighting setting of the instrument
panel on handlebar.
To access the function it is necessary to view the "setting" menu page 48, using
button (1, fig. 14) ?&q ...
Other materials:
Refitting the throttle twistgrip
Lubricate the ends of the throttle grip cables (10) and the twistgrip race
with the recommended grease.
The closing cable (10) features a writing on the yellow tube, whereas the
opening one (10) features such writing on the
white tube.
To refit the throttle control components, proceed i ...
Adjusting the clutch lever and front brake lever
The clutch lever (1) is fitted with a span adjuster (2) which serves to alter
the distance of the lever from the handlebar.
The lever distance can be adjusted through 10 clicks of the dial (2). Turn
clockwise to increase lever distance. Turn the
adjuster counter clockwise to decrease lever d ...
Refitting the cylinder heads pulleys/fixed tensioners
Check that the keyway on the end of the camshaft is in good condition and
without burrs.
Fit a woodruff key (b) in the keyway of each camshaft.
Fit the pulley (11) on the camshaft, inserting the woodruff key in the in the
slot (c) in the pulley.
Apply the recommended grease to the t ...