
Ducati Diavel Owners Manual: Beam setting
When checking beam setting, put the motorcycle upright.
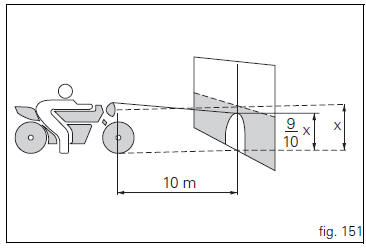
Tyres should be inflated at the correct pressure and one person should be sitting astride the motorcycle, keeping it at right angles to its longitudinal axis. Place the motorcycle opposite a wall or a screen, 10 meters apart from it, draw a horizontal line on the wall at the height of the centre of the headlight and a vertical one in line with the longitudinal axis of the motorcycle.
If possible, perform this check in dim light.
Switch on the low beam headlight.
The height of the upper limit between the dark area and the lit area must not be more than nine tenths of the height of the centre of the headlamp from the ground.
 Note
Note
The procedure described here is in compliance with the italian standard establishing the maximum height of the light beam.
Owners in other countries should adapt this procedure to the regulations in force in the country where the motorcycle is used.
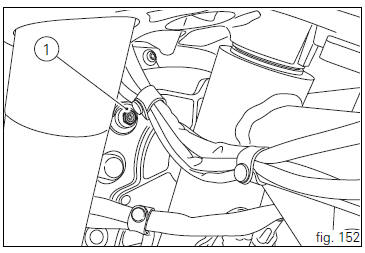
To adjust the headlight beam vertically, turn the screws (1), for horizontal adjustment, turn the screw (2).

 Replacing the high and low beam bulbs
Before replacing a burnt-out bulb, make sure that the new
bulb complies with the voltage and wattage specified in the
"wiring diagram", page 179. Always test the new bulb
before refitting ...
 Rear-view mirror adjustment
The rear-view mirror can be adjusted manually by pressing
points (a).
...
Other materials:
The hands free relay
Introduction
This relay provides key on +15 power to all the devices on the motorcycle.
Functionally, it replaces the conventional
ignition switch.
Wiring diagram
The hands free relay receives +12 volt power directly from the battery via
the main 30 a fuse. Hands free - 3: pin 3 on
hand ...
Refitting the front wheel
When all the necessary inspections have been completed, refit the wheel as
follows.
Fit the spacers (3) and (9) to the seal rings on the sides of the wheel hub.
Install the complete wheel between the fork legs.
Lubricate the shank and thread of the wheel axle (10).
Take the pin ...
Removal of the control unit
Loosen the screws (1) and remove the relay supporting bracket (2), disconnect
the connectors (3) and remove the control
unit (4) from the vehicle.
...