
Ducati Diavel Service Manual: Bleeding of the abs hydraulic system
If some "sponginess" is detected on the brake control, due to air bubbles in the system, bleed the system, as indicated in sect. 4 - 3, Changing the brake fluid.
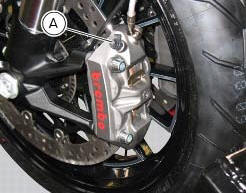
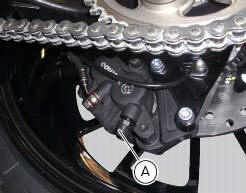
Before bleeding a brake pump, move back the calliper pistons, as indicated in (sect. 4 - 3, Changing the brake fluid) to Drain in the pump the air collected near the abs control unit purge must be carried out by means of the corresponding joints (a) placed near the callipers and the brake pumps.
Important
Do not undo the fixing screws of the joints of the pipes on the abs hydraulic control unit, unless control unit replacement is necessary.
Important
If the abs control unit is replaced, this must be supplied with secondary circuit already full of fluid; the control unit must be fitted and the system filled and bleeded as a traditional system.

 Adjusting of the air-gap phonic wheel sensor
(For front as well as rear sensor) in each case of maintenance that foresees:
Replacement or refitting of the wheel
Replacement or refitting of the phonic wheel (1) or (2)
Replacement or refit ...
 Handlebar unit
...
Other materials:
Replacing the rear phonic wheel sensor
Disconnect the rear abs sensor (5) connector (c) from the main electric
wiring.
Open all the retainer clamps of the rear abs sensor cable (5): refer to table of
sect. 7 - 6, Flexible wiring/hoses
positioning.
Remove the rear abs sensor (5) from its seat on the rear calliper mounting ...
Protective apparel
Always wear a helmet. Most motorcycle accident fatalities
are due to head injuries.
For safety eye protection, gloves, and high top, sturdy boots
should also be worn.
The exhaust system becomes very hot during operation,
never touch the exhaust system. Wear clothing that fully
covers your ...
Oil pump
Complete oil pump assembly
O-ring
Circlip
O-ring
Pump body
Circlip
Reducer bush
Spring washer
Screw
Screw
Spring washer
Pump drive gear
Key
By-pass plug
Locating bush
By-pass spring
By-pass valve
Spare parts catalogue
Diavel abs filters and oil pump
Diavel ...