Ducati Diavel Owners Manual: California emission control warranty statement
Your warranty rights and obligations
The california air resources board is pleased to explain the emission control system warranty on your my 2011 motorcycle. In california, new motor vehicles must be designated, built and equipped to meet the state's stringent anti-smog standards. Ducati north america, inc. Must warrant the emission control system on your motorcycle for the periods of time listed below provided there has been no abuse, neglect or improper maintenance of your motorcycle.
Your emission control system may include parts such as fuelinjection system, the ignition system, catalytic converter, and engine computer. Also included may be hoses, belts, connectors and other emission-related assemblies. Where a warrantable condition exists, ducati north america, inc. Will repair your motorcycle at no cost to you including diagnosis, parts and labor.
Manufacturer’s warranty coverage
- 5 Years or 30,000 kilometers (18641 miles), whichever first occurs.
Owner's warranty responsibilities:
- As the motorcycle owner, you are responsible for the performance of the required maintenance listed in your owner's manual. Ducati north america, inc. Recommends that you retain all receipts covering maintenance on your motorcycle, but ducati north america, inc. Cannot deny warranty solely for the lack of receipts or for your failure to ensure the performance of all scheduled maintenance.
- You are responsible for presenting your motorcycle to a ducati dealer as soon as a problem exists. The warranty repairs should be completed in a reasonable amount of time, not to exceed 30 days.
- As the motorcycle owner, you should also be aware that ducati north america, inc. May deny you warranty coverage if your motorcycle or a part has failed due to abuse, neglect, improper maintenance or unapproved modifications.
If you have any questions regarding your warranty rights and responsibilities, you should contact ducati north america, inc. At 001.408.253.0499 Or the california air resource board at 9528 telstar avenue, el monte, ca 91731.
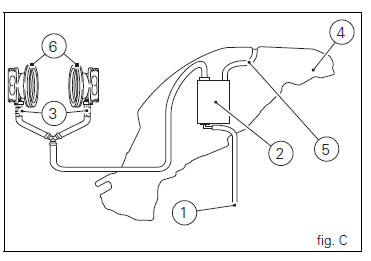
California evaporation emission system
- Warn air inlet;
- Canister;
- Dell’orto jet;
- Fuel tank;
- Breather pipe;
- Intake manifolds.
 Important
In the event of fuel system malfunction, contact ducati’s authorized service centres.
 Protective apparel
Always wear a helmet. Most motorcycle accident fatalities
are due to head injuries.
For safety eye protection, gloves, and high top, sturdy boots
should also be worn.
The exhaust system become ...
 Ducati limited warranty on emission control system
Ducati north america, inc., 10443 Bandley drive cupertino,
california, 95014 warrants that each new 1998 and later
ducati motorcycle, that includes as standard equipment a
headlight, tail-light and ...
Other materials:
Abs fault indicator not working
Fault codes
Dds: displays a fault code described in the description of the abs system.
Dashboard: no fault code displayed.
Wiring diagram
Checks
The abs fault indicator indicates the occurrence of one or more faults in the
antilock brake system, or if the system itself
has been disable ...
The hands free module
Introduction
The hands free module incorporates the control unit communicating with the
other nodes on the motorcycle, the on/off
button, the microswitches detecting full lock steering angle (for enabling
steering lock engagement) and the steering lock.
The module is sealed and its individu ...
Check the engine oil pressure
Note
The on-screen icons used during this procedure are explained in a table at
the end of this section.
To measure the pressure of the lubrication circuit, use the engine oil pressure
test point (19) as described below.
Disconnect the wiring connector (f) of pressure switch (1) and rem ...