
Ducati Diavel Service Manual: Changing the brake fluid
Warning
Brake fluid is corrosive and will damage paintwork. Avoid contact with eyes and skin. In the case of accidental contact, wash the affected area thoroughly with plenty of running water.
Changing the fluid in the front brake circuit
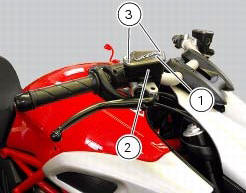
Remove the cover (1) with the membrane from the front brake fluid tank (2) by undoing the screws (3).
Siphon off the fluid from the reservoir (2).
Replace the membrane (without the plug) on the tank to avoid brake fluid splashes during the following operations.
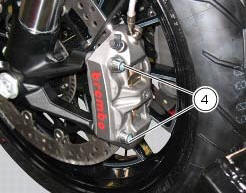
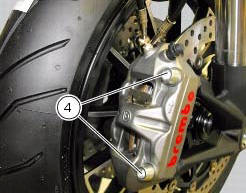
Move the brake callipers pistons back: to carry out this operation unscrew the fixing screws (4) of the callipers on the fork plates and push, by removing them from each other, both pads from every calliper; during this operation be careful with the fluid level, that must always be aspirated each time that it flows back in the tank.
Once that all pistons of both callipers are fully moved back and that all the fluid in the tank has been aspirated, connect to the bleed valve (5) a transparent tube by immersing the end in a container placed on the floor.

Fill the reservoir (2) with new brake fluid up to the max. Mark.
Operate the lever to reach the 20 - 30 mm end of stroke and keep the lever in this position by using a non-elastic clamp.

Loosen the bleed valve of the left calliper (from the rider view) (5) and then take the lever through the whole stroke to allow fluid to escape.
The lever is supported to the grip.
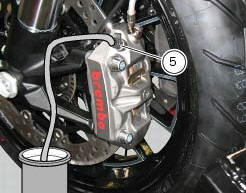
Tighten the bleed valve (5) to a torque of 23 nm +/-10% (sect. 3 - 3, Frame torque settings) then release the lever.
Repeat the operation described above until the old fluid flows completely.
Then, with the bleed valve definitely closed to the specified torque actuate repeatedly the lever until a pressure is detected in the brake system.
Warning
After eliminating the old fluid from the tank, during the refilling operation always keep the oil level above the min mark to prevent the formation of air bubbles inside the circuit.
Changing the rear brake circuit fluid
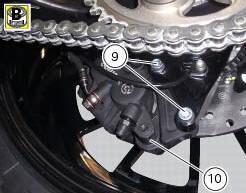
Undo the two fixing screws (9) of the rear brake calliper (10) to the
calliper holder bracket and remove the brake calliper
(10). 

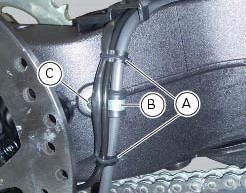
Remove the ties (a) and the hose clip (b) by loosening the screw (c).
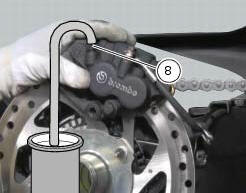
Attach a length of transparent plastic tubing to the bleed valve (8) and insert the other end of the tubing in a container placed on the floor.
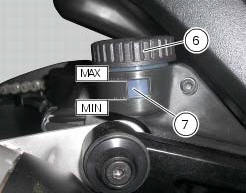
Unscrew the cap (6) of the rear brake fluid reservoir (7).
Siphon off the fluid from the reservoir (7).
Fill the reservoir (7) with new brake fluid up to the max. Mark.
Press the pedal to allow the circuit to go under pressure.
Keep the pedal pressed to the bottom.

Loosen the bleed valve (8) to allow fluid to escape.
The pedal is at the end of the stroke in lower position.
At this point, tighten the bleed valve (8) to the specific torque of 23 nm +/-10% (sect. 3 - 3, Frame torque settings) and release the pedal; press the pedal.
Repeat the operation described above until the old fluid flows completely.

Warning
After eliminating the old fluid from the tank, during the refilling operation always keep the oil level above the min mark to prevent the formation of air bubbles inside the circuit.
Apply the recommended threadlocker on the screw (c).
Refit pipe grommet (b) and tighten the screw (c) to a torque of 4 nm +/-10% (sect. 3 - 3, Frame torque settings).
Lock the rear brake hose, the tail light wiring and the speed sensor by means of the new ties (a).

Fit the rear brake calliper (10) over the brake disc, aligning it with the holes in the calliper mounting bracket.
Grease the screws (9) and tighten to the torque of 25 nm +/-5% (sect. 3 - 3, Frame torque settings).

 Changing the coolant
Warning
This operation must only be carried out when the engine is cold.
Attempting to change the coolant with the engine hot
could lead to burns from hot coolant or scalding steam.
Place a con ...
 Changing the clutch fluid
Warning
Clutch fluid will damage painted surfaces if spilled on them. It is
also very harmful if it comes into contact with the skin or
with the eyes; in the event of accidental contact wash the a ...
Other materials:
Fuel pressure test
Note
The on-screen icons used during this procedure are explained in a table at
the end of this section.
Undo the screws (2) and remove the flange cover (1).
Remove one of the two pipes of the fuel system (3).
Use the fuel pressure pipe (4) part no. 590.1.189.1A by connecting one e ...
Injection and ignition
Introduction
Ignition is via a single stick coil per cylinder installed in the spark plug
well. Each thermal unit is supplied by a single
injector, placed under the throttle valve. The amount of fuel injected and the
ignition advances are determined by the
control unit specifically for each c ...
Removing the frame and the lateral footrests
Loosen the two special screws (6) to separate the frame (1) from the lateral
brackets (2) and (3).
On the left side of the vehicle block retaining pins (9) and loosen the nuts (8)
on the right side at the same time.
Slide out the retaining pins (9) and remove the frame (1) from the lateral ...