
Ducati Diavel Service Manual: Checking the coolant level
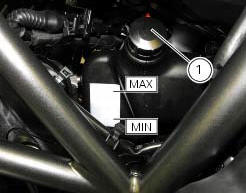
To the specified intervals in the "scheduled maintenance chart" (sect. 4 - 2) Check the coolant level contained in the expansion reservoir, on the right side of the vehicle.
The coolant level must be between the max. And min marks on the tank.
If the level is low, top up with the recommended coolant.
Remove the filler cap (1) and top up with new coolant to the specified level.
Refit the plug (1).
For optimal operating conditions (coolant mixture starting to freeze at -20 C), the recommended fluid antifreeze should be mixed with water in the following percentages: antifreeze: 35 to 40% of the volume; water: 65 to 60% of the volume.
Important
Very hard water with a high mineral salt content can damage the engine.
Increase the amount of antifreeze to up to 55% volume in the case of very cold climates.
Important
Solutions with less than 30% of antifreeze will not provide sufficient protection against corrosion.
 Changing and cleaning the air filters
The air filter must be replaced at the intervals described in the "scheduled
maintenance chart" (sect. 4 - 2).
Work on the vehicle right side, loosen screws (1) that secure the intake duct
(2 ...
 Changing the coolant
Warning
This operation must only be carried out when the engine is cold.
Attempting to change the coolant with the engine hot
could lead to burns from hot coolant or scalding steam.
Place a con ...
Other materials:
Changing the brake fluid
Warning
Brake fluid is corrosive and will damage paintwork. Avoid contact
with eyes and skin. In the case of accidental contact,
wash the affected area thoroughly with plenty of running water.
Changing the fluid in the front brake circuit
Remove the cover (1) with the membrane from the front b ...
Low hands free key (hf) battery level
The activation of this (amber yellow) "warning" indicates
that the hands free system has detected that the battery
that permits the active key (1, fig. 62) To communicate and
turn the vehicle on is almost discharged.
Note
In this case, ducati recommends replacing the battery
as soon ...
Keys (fig. 62)
The owner receives a set of keys comprising:
1 Active key (1, fig. 62)
1 Passive key (2, fig. 62)
It contains the code used by the "hands free" system for the
key-on, in different modes.
The active key (1, fig. 63) Is the one that is normally used:
press button (a, fig. 63) To ...