
Ducati Diavel Owners Manual: Clock setting function
This function sets the clock.
To access the function it is necessary to view the "setting" menu page 48, using
button (1, fig. 14) ?"
"or (2, fig. 14) ?" "select the "clock"function and
press the reset button
(12, fig. 12) To confirm.
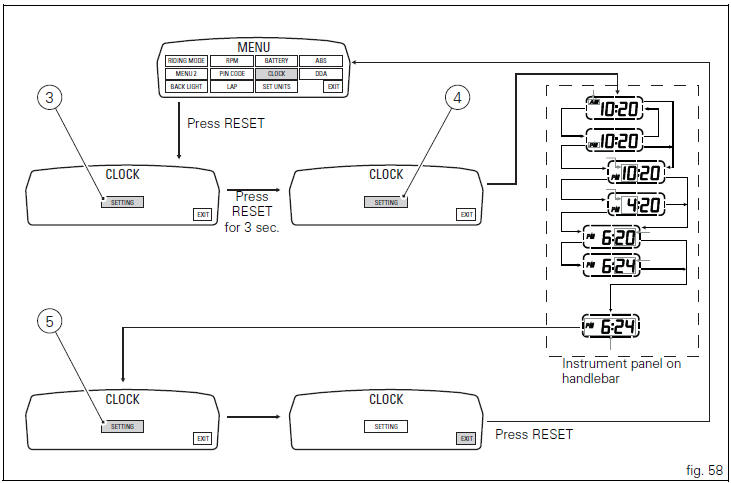
In the following screen the message "setting" is highlighted in green (3, fig. 58); Now, press the reset button (12, fig. 12) For 3 seconds to edit the time displayed on the instrument panel on handlebar, and the "settin"h indication highlighting becomes grey (4, fig. 58).
Clock setting
On entering this mode, the message "am"will flash; if you press the button
(2, fig. 14) ?" " "pm"flashes; if you
press the button (2, fig. 14) ?" "you
"you
will return to the
previous step (if it is 00:00, when switching between "am"
to "pm", 12:00 will be displayed).
Pressing button (1, fig. 14) ?" "
"
accesses the hour setting
mode; the hours start to flash.
Each time you press the button (2, fig. 14) ?" ",
",
the digit will
increase by 1 hour; if the button is held pressed down (2, fig.
14) ?" "the digit will increase by 1
hour every second (when
the button is held depressed, the hours do not flash).
Pressing button (1, fig. 14) ?" " gives
access to the minute
setting mode; minutes start to flash.
Each time you press the button (2, fig. 14) ?" ",
",
the digit will increase by 1 minute; holding down the button (2, fig. 14) ?" ",
",
the digit will increase by 1 minute each second; if the button is held depressed
(2, fig. 14) ?" " for over 5 seconds,
minutes will increase by 1 minute every 100 m (while the button is held
depressed (2, fig. 14) ?" ",
",
the
seconds will not flash).
If you press button (1, fig. 14) ?" "setting
is completed and
the instrument panel on tank display "settin"h item is
again highlighted in green (5, fig. 58).
To exit, select "exit"and press the reset button (12, fig. 12).
 Note
Note
In case of a battery is cutoff, when the voltage is restored and at the next key-on, the clock is always reset (it starts automatically from 00:00).
 Battery voltage indicator (battery)
This function describes the battery voltage indicator.
To access the function it is necessary to view the "setting" menu page 48, using
button (1, fig. 14) ?"" or (2, fig.
1 ...
 Units of measurement modification function
This function allows you to change the units of measurement
of the displayed values.
To access the function it is necessary to view the "setting" menu page 48, using
button (1, fig. 14 ...
Other materials:
General maintenance indications
Useful tips
Ducati recommends that you follow the instructions below in order to prevent
problems and obtain the best end result:
When diagnosing faults, primary consideration should always be given to
what the customer reports about motorcycle
operation since this information can highli ...
Engine setting function (engine power control)
This function customises engine power and output.
To access the function it is necessary to view the "setting" menu page 48, using
button (1, fig. 14) ?"
"or (2, fig. 14) ?" "select the "riding mode"function
and press the
reset button (12, fig. 12) T ...
Description of the clutch assembly
The clutch is disengaged by a drive unit consisting of a thrust piston (c)
accommodated inside a small cap mounted to
the generator cover. This piston (c) pushes a pushrod (b), which runs through
gearbox primary shaft and operates the Pressure plate (4)
located on top of the clutch plate pack ...