
Ducati Diavel Service Manual: Dashboard
Note
The dashboard is supplied as a single component; its internal components cannot be renewed separately.
Important
Whenever the dashboard is renewed, the ignition key programming procedure must be repeated.
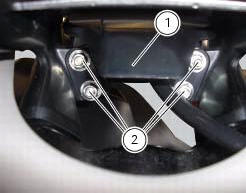
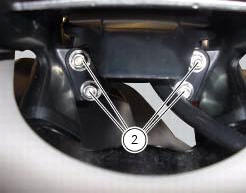
Loosen the nuts (2) to remove the master dashboard (1) from its seat and disconnect the connector (a) of the main wiring.

To remove the slave dashboard (3) remove the front tank fairing as indicated in sect. 5 - 2, "Removal of the fuel tank fairings".

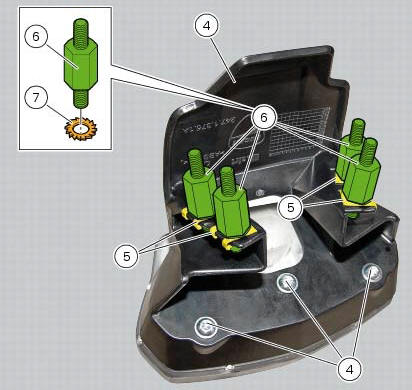
Refitting is the reverse of removal; be sure to check that the dashboard is mounted on its support with the screws (4) tightened to a torque of 3 nm +/- 10% (sect. 3 - 3, Frame torque settings).
Check the presence of clips (5) and stud bolts (6) with washers (7). The stud bolts (6) must be tightened to a torque of 2 nm +/- 10% (sect. 3 - 3, Frame torque settings).
Tighten the nuts (2) to a torque of 3 nm +/-10% (sect. 3 - 3, Frame torque settings).
 Instruments
...
 Dashboard system
The vehicle is equipped with two dashboards: an lcd (1) located on the
handlebar containing the key indications (speed,
rpm, engine coolant temperature, and clock) and a tft colour display (2) loca ...
Other materials:
Changing bulbs
Changing the headlight bulbs
Before replacing a burnt out light bulb, ensure that the replacement bulb has
the same voltage and power rating as
specified for the lighting device in question (sect. 3 - 1.1, Lights/instrument
panel).
Warning
The halogen light bulbs in the headlight become hot ...
Checking valve clearances
To check the valves clearance, it is necessary to have access to the cylinder
head covers and then remove the
components listed below.
Unscrew the two fixing screws (1) of the cover (2) according to the
crankshaft.
Fit the tool handgrip 88713.0123 In the holes of the generator cover t ...
Removal of the front forks
Before removing the front forks, it is first necessary to remove the
following parts:
Loosen the clamp screws (1) holding the fork legs to the steering head (3).
Loosen the clamp screws (2) and (26) securing the fork legs to the bottom yoke
(4).
Withdraw the fork legs (5) and (6) downwar ...