
Ducati Diavel Service Manual: Dashboard diagnosis
This function identifies any abnormal vehicle behaviours.
The dashboard activates any abnormal vehicle behaviours in real time (errors).
At key-on (at the end of the check) one or more "errors" are displayed in red (only if they are active).
When an "error" is triggered, the indication (red) remains well visible (1) for 10 seconds then becomes smaller (2).
If there are multiple errors, they will scroll automatically every 3 seconds. The "engine/vehicle diagnosis - eobd" light on dashboard located on handlebar always turns on when one or more errors are activated.
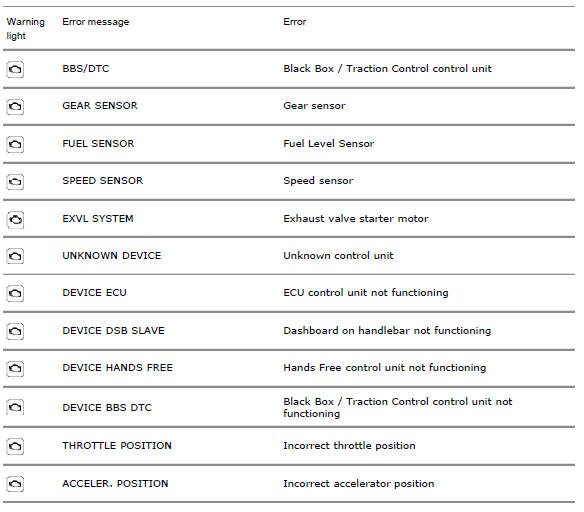
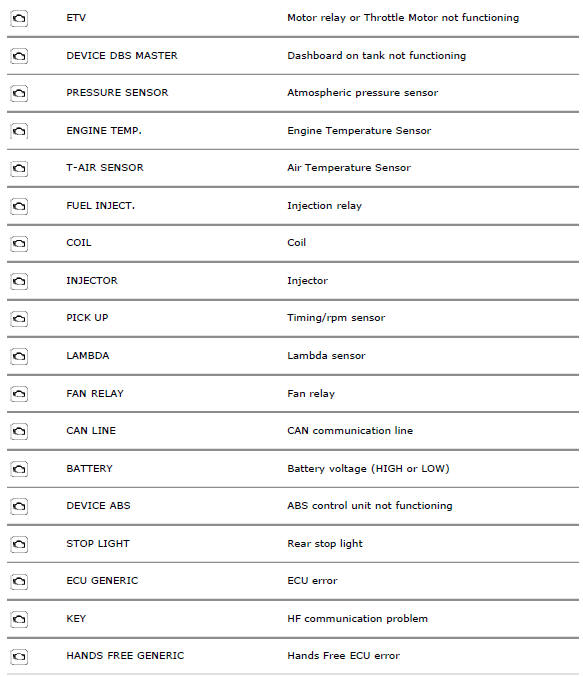
The table below shows the errors that can be displayed.
 Steering release error - steering still locked
The activation of this (amber yellow) "warning" indicates that the hands free
system was not able to extract the steering
lock.
Note
In this case, we recommend switching the vehicle off and on (k ...
 Setting menu
This menu is used to enable/disable and set some motorcycle functions.
To access the "setting menu" press and hold button (2) "t" for 3 seconds.
Note
When within this menu no other function can b ...
Other materials:
Trip 2 meter
This function shows the distance travelled since the trip meter was last
reset (in km or miles depending on the specific
application).
Press and hold (1) "s" for 3 seconds while in this function to reset the trip
odometer.
When the reading exceeds 9999.9, Distance travelled is reset and t ...
Removal of the expansion tank
Loosen the clamp (6), open the hose guide (a) and slide the hose (7) out of
the radiator.
Open clamps (14) and release the hoses that pass through them.
Loosen the screws (16).
Remove the tank (12) with its hoses (7) and (20) and the support (15).
Loosen the clamp (19) to r ...
Description of the diagnosis instrument (dds)
The "dds" diagnostic system lets you diagnose any faults in the
injection-ignition system via a serial port. The system is
also equipped with functions to test various devices on the motorcycle. The dds
diagnosis instrument can be used to
measure current and voltage on any electrical device, t ...