
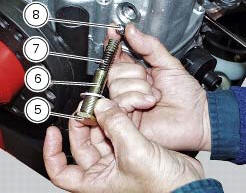
Ducati Diavel Service Manual: Disassembly of gear interlock plunger and pawl assembly
Unscrew the interlock plunger screw (5) and remove the seal (6), spring (7) and the detent ball (8).
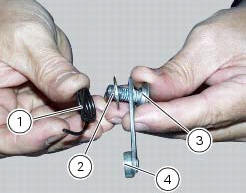
Unscrew the clutch-side crankcase half screw (3) and remove the pawl (4), washer (2) and spring (1).

 Removal of the gear selector lever
Unscrew and remove the fixing screws (18) and (20) of the complete gear
selector lever (21) and collect the spacer (19).
Remove the gearchange mechanism complete with the shaft, spring, and s ...
 Refitting the gear interlock plunger and pawl assembly
On the special screw (3), fit the gear pawl lever (4), orienting it as shown
in the figure, the washer (2) with the square
edge side (d) facing the clutch-side crankcase half, and the spring (1),
...
Other materials:
Refitting the hands free
Reassembly is a reversal of the removal procedure: in particular apply
prescribed threadlocker to screws (2) and tighten
them to a torque of 20 nm +/- 10% (sect. 3 - 3, Frame torque settings).
If the hands free button has been previously removed, when refitting it insert
the spring (6) on pi ...
Refitting the rear mudguard
Place the rear mudguard (8) on the swingarm, fitting the screws (9) with
recommended threadlocker.
The screw (9) in the bottom hole of the rear mudguard (8) must be installed with
the washer (r).
Tighten the screws (9) to a torque of 5 nm +/- 10% (sect. 3 - 3, Frame torque
settings).
...
Checking engine oil level
Check the engine oil level through the sight glass (1) on the
clutch cover. When checking oil level, the motorcycle should
be perfectly upright and the engine cold. The oil level should
be between the two marks next to the sight glass. If level is
low, top up with shell advance ultra 4 engine oi ...