
Ducati Diavel Service Manual: Disassembly of rear shock absorber - rocker arm - linkage assembly
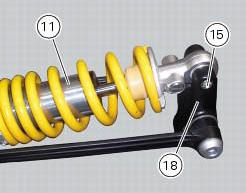
Undo the screw (15) and remove the rear shock absorber (11) from the rocker arm (18).
Undo
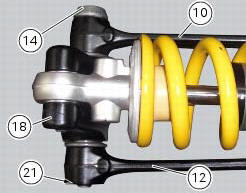
Undo the screw (14) and the nut (21) and remove the linkages (10) and (12) from the rocker arm (18).
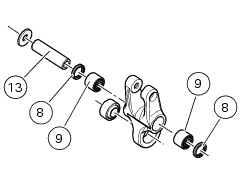
The rocker arm movement is obtained by needle roller bearings (9) rotating on a spacer (13); two seals (8) are placed at the outer ends and keep the lubricant inside the roller cages.
Remove the inner spacer (13), the seals (8) and the needle roller bearings (9) using a suitable punch.
Important
Take care not to damage the bearing housings on the rocker arm while driving out the bearings. Once removed, the seals (8) and needle roller bearings (9) may not be refitted.
 Removal of the rear shock absorber
Loosen the screws (22) and remove the assembly (34) from the frame.
Loosen the screws (27) and remove the tank unit (s) of the shock absorber
from the support (19).
Hold the lh bush (6 ...
 Reassembly of rear shock absorber - rocker arm - linkage assembly
Once the needle roller bearings (9) have been removed from the rocker arm
(18), upon reassembly fit a new needle roller
bearing (9) on drift part no. 88713.1071 And lubricate with recommended greas ...
Other materials:
Residual range indication when the service is due
After resetting the first oil service warning (triggered at
1000 km), upon every key-on the system displays the
indication of which type of service should be performed next
(oil service or desmo service) and the residual range.
A (green) warning (1, fig. 32) Is activated for 2 seconds on
ever ...
Refitting the front sprocket
Grease the o-ring (16) and install it on the front sprocket spacer (15).
Fit the spacer, from the o-ring side, on the secondary shaft and drive it fully
home against the inner ring of the bearing.
Check that the splines of the gearbox secondary shaft and the sprocket are in
perfect condi ...
Removal of the front footrests
Note
The removal of the front footrests is described only for the right one (2)
but it is the same also for the left one.
Remove the circlip (5) by releasing the pin (3).
Slide the pin (3) off the frame by supporting the footrest (2).
Slide off the footrest (2) from its seat and collect th ...