
Ducati Diavel Service Manual: Disassembly of the gearchange mechanism
Refer to the exploded view at the beginning of this section for indications on disassembly and renewal of gearchange components.
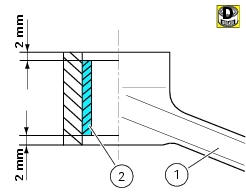
If the bushing (2) inside the pedal (1) needs replacing, grease the external surface and drive the new bushing into place using a press. The bushing must be seated 2 mm below the outer face of the pedal.
Warning
After working on the gearchange control, check the position of the gearchange pedal.
To adjust the gearchange pedal position, follow the instructions indicated in sec. 4 - 3, Adjusting the position of the gear change and rear brake pedals.
 Removal of the gearchange control
Loosen and remove the pivot screw (4) securing the gearchange pedal (1) and
recover the washer (9) and the o-ring Seals (5).
Loosen and remove the screw (7) securing the gearchange lever (8 ...
 Refitting the gearchange mechanism
Make sure that the gearchange linkage assembly (6) is installed with the ball
joint with a left-hand thread (a) facing the
lever (8).
Apply the recommended grease to the non-threaded surface of ...
Other materials:
Refitting the handlebar
Position the handlebar (4) so that the external lower corner of the marks (a)
on the handlebar matches the upper internal
corner of the lower u-bolts (b) as shown.
Apply the recommended grease to the threads and undersides of the heads of
the screws (3).
Important
Position the upper u-bo ...
Tft - parameter setting/display
Warning
Any adjustments to the instrument panel must only be
carried out when the motorcycle is stationary. Never operate
the instrument panel controls while riding the motorcycle.
At the end of the check, the instrument panel always
displays as the "main" indication the odometer (to ...
Menu 2 on/off function
This function turns off and back on the menu 2.
If menu 2 is disabled, the functions for average fuel
consumption (cons.Avg), instantaneous fuel consumption
(cons.), Average speed (speed avg), trip time (trip time)
and air temperature (air) will no longer be displayed in the
"main screen ...