
Ducati Diavel Service Manual: Electrical components support
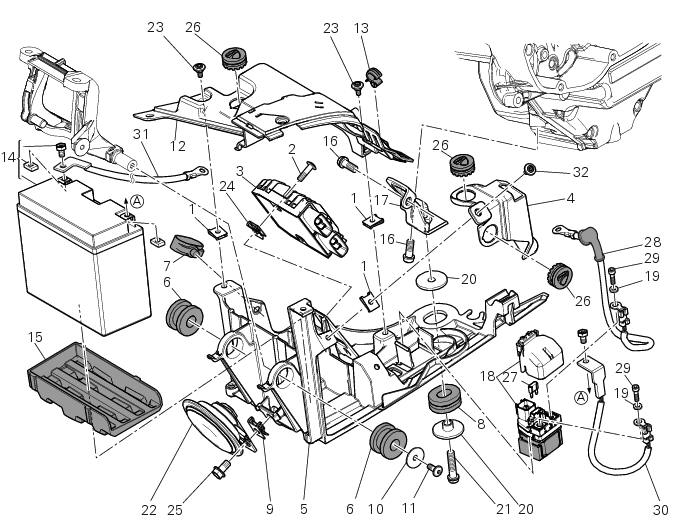
- Clip
- Screw
- Voltage regulator
- Battery fixing bracket
- Battery support
- Vibration damper mount
- Hose clip
- Vibration damper mount
- Clip
- Washer
- Screw
- Cover
- Cable grommet
- Battery
- Battery mat
- Screw
- Bracket
- Solenoid starter
- Spring washer
- Spacer
- Screw
- Horn
- Screw
- Clip
- Screw
- Rubber pad
- 30 A fuse
- Solenoid starter cable - starter motor
- Screw
- Screw
- Battery ground cable - engine
- Special screw
Spare parts catalogue
Diavel abs battery support
Diavel carbon abs battery support
Important
Bold reference numbers in this section identify parts not shown in the figures alongside the text, but which can be found in the exploded view diagram.
 Reassembly of belly fairing
Position the oil cooler shield (7) inserting the tab (a) into the slit (b) in
the electrical components support (s).
Note
On refitting, make sure that the tab (c) remains positioned under the
re ...
 Removing the electrical components support
Remove the following elements located inside the electrical components
support:
The battery fixing bracket (4) and the battery (14) as specified under
section 6 - 2, battery;
The voltag ...
Other materials:
Lcd unit functions
Speedometer.
Gives road speed.
Rev counter.
Indicates engine revs per minute.
Clock.
Water temperature indicator.
Indicates engine coolant temperature.
Important
Stop riding if the temperature reaches the maximum
value, otherwise the engine might be damaged.
...
Steering head: steering
Screw
Steering head
Screw
Lower rh u-bolt
Lower lh u-bolt
Bearing
Screw
Sealing ring
Washer
Spacer
Washer
Nut
Washer
Screw
Bottom yoke
Dowel
Nut
Screw
Special screw
Clip nut
Left-hand support
Front splashguard
Right-hand support
Front support
S ...
Key-on/key-off using the key on the hands free lock with the passive key
Key-on can be performed by pressing the button (7) on the
hands free lock and with the presence of the passive key (4,
fig. 77).
Note
The passive key (4, fig. 77) Has a range of a few cm,
therefore the key (4, fig. 77) Must be positioned near the
antenna (2). Remove the seat (see "remova ...