Ducati Diavel Service Manual: Engine setting function (engine power control)
This function customises engine power and output.
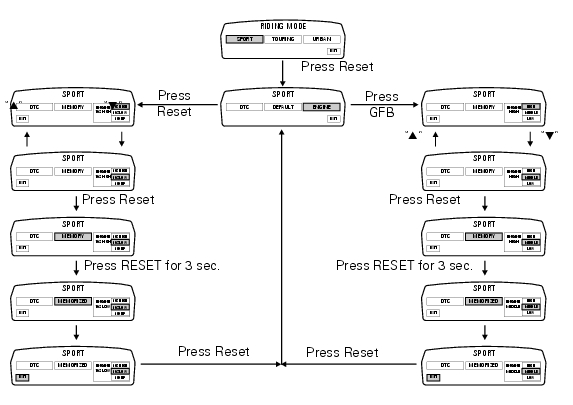
To access the function it is necessary to view the ""setting" menu", using buttons (1) "s" or (2) "t" select the "riding mode" function and press the reset button (3) to enter the following page.
Use button (1) "s" or (2) "t" to select the riding mode to be changed and press the reset button (3) to access the next page; use button (1) "s" or (2) "t" to select the "engine" indication and press the reset button again (3) to confirm selection.
When accessing the function, the engine setting (engine 162 high, 162 low o 100 hp) appears at the right-hand side of the display, inside a rectangle.
Note
In japan and france versions, the display displays the settings (engine high, middle or low).
Using button (1) "s" or (2) "t" select one of the three available engine settings; after selecting the new setting, press the reset button (3) to highlight "memory" indication.
At this point, store the new setting by pressing and holding the reset button (3) for 3 seconds with "memory" displayed.
If the setting has been stored successfully, the display will show "memorized" in green for 2 seconds and the exit option will be highlighted automatically.
To exit the setting function, press the reset button (3) when "exit" is highlighted.

 Tips on how to select the sensitivity level
Warning
The 8 level settings of the dtc were calibrated using tyres of the
same make, model and size as those originally fitted to
the motorcycle.
The use of tyres of different size to the orig ...
 Default function (resetting ducati default parameters)
This function resets the parameters set by ducati for each riding style.
To access the function it is necessary to view the ""setting" menu", using
buttons (1) "s" or (2) "t" select the "riding
...
Other materials:
Trip 1 meter
This function shows the distance travelled since the trip meter was last
reset (in km or miles depending on the specific
application).
Press and hold (1) "s" for 3 seconds while in this function to reset the trip
odometer.
When the reading exceeds 9999.9, Distance travelled is reset and t ...
Reassembly of rear shock absorber - rocker arm - linkage assembly
Once the needle roller bearings (9) have been removed from the rocker arm
(18), upon reassembly fit a new needle roller
bearing (9) on drift part no. 88713.1071 And lubricate with recommended grease.
Support the rocker arm and drive the needle roller bearings into the rocker arm
bore until t ...
Deactivating the service indication on the dashboard
The message "serv" is displayed on the dashboard, indicating that the
motorcycle should be serviced in accordance with
the programmed maintenance plan. This indication is activated after the first
1000 km and thereafter at intervals of
12000 km.
After the scheduled service has been carried ...