
Ducati Diavel Service Manual: Evaporative emissions canister
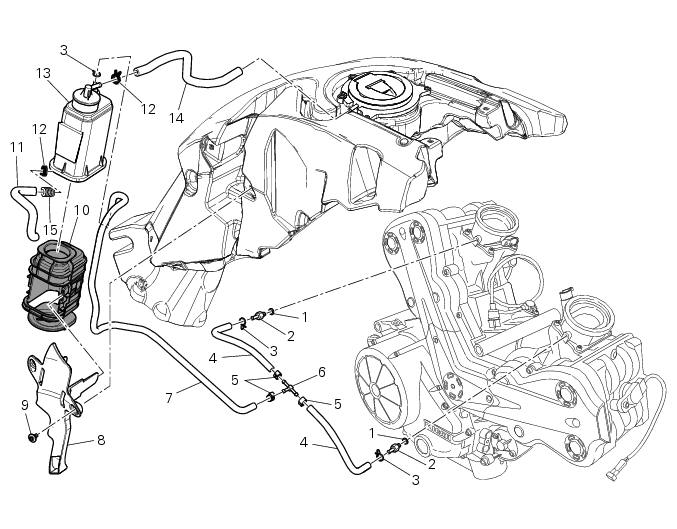
- Sealing washer
- Union
- Hose clip
- Hose
- Clamp
- "T" fitting
- Hose
- Support
- Special screw
- Rubber mounting
- Hose
- Hose clip
- Evaporative emissions canister
- Hose
- Spring
Spare parts catalogue
Diavel abs evaporative emissions canister
Diavel carbon abs evaporative emissions canister
Important
Bold reference numbers in this section identify parts not shown in the figures alongside the text, but which can be found in the exploded view diagram.
- Evaporative emissions canister system (usa versions only)
- Removal of the evaporative emissions canister
- Refitting the evaporative emissions canister
 Refitting the silencer
Position the silencer guard (41) and fix it by starting the screws (40).
Tighten the screws (40) to a torque of 8 nm +/- 10% (sect. 3 - 3, Frame torque
settings).
Insert the silencer (4) int ...
 Evaporative emissions canister system (usa versions only)
Usa models are equipped with an additional system with an evaporative
emissions canister that prevents fuel fumes from
being discharged into the atmosphere.
The breather hose (4) is connected to t ...
Other materials:
Location of elements on motorcycle
(A) injection relay; (b) etv relay (throttle valve operating engine); (c)
radiator fan relay; (d) hands free relay.
(E) ecu; (g) bbs (black box system or central electronics); (f) abs hydraulic
unit with integrated control unit.
Fuses located at the rear left of the vehicle.
...
Gear change pedal
When released, the gear change pedal (1, fig. 96)
Automatically returns to rest position n in the centre. This is
indicated by the instrument panel light n (2, fig. 4) Coming on.
The pedal can be moved:
down = press down the pedal to engage the 1st gear and to
shift down. At this point the n ...
Refitting the rear wheel
Lubricate the wheel shaft threaded end with prescribed grease.
Insert the wheel shaft by matching (a) with pins (b).
Install spacer (3) with the conical surface faced to the wheel conical
surface, washer (2), apply prescribed grease to nut
(1) and insert it by hand (1).
Tighten the ...