Ducati Diavel Service Manual: Evaporative emissions canister system (usa versions only)
Usa models are equipped with an additional system with an evaporative emissions canister that prevents fuel fumes from being discharged into the atmosphere.
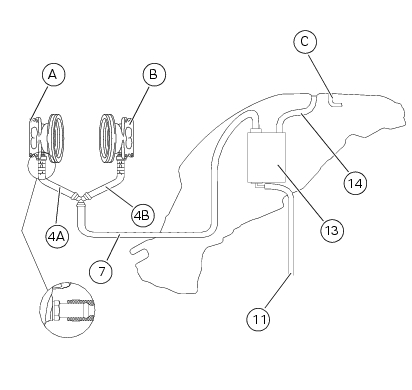
The breather hose (4) is connected to the canister filter (1); when the fuel has been filtered, it is returned through the hose (2) to the horizontal (a) and vertical (b) intake manifolds via the hoses (2a) and (2b). Drainage pipe (c) and the hose (5) vent to the ground.
For correct positioning of the connection hoses consult the indications given below.
 Evaporative emissions canister
Sealing washer
Union
Hose clip
Hose
Clamp
"T" fitting
Hose
Support
Special screw
Rubber mounting
Hose
Hose clip
Evaporative emissions canister
Hose
Spring
Spare p ...
 Removal of the evaporative emissions canister
Loosen the screws (9) securing the plate (8) to the tank.
Slightly pull the plate (8) with the canister (13), remove the clamps (3) and
(12) and connect hoses (7) and (14).
Release the ...
Other materials:
Indicator trip time - trip time
This function shows the vehicle trip time.
The calculation is made considering the time travelled since
the last trip 1 reset. When trip 1 is reset, the value is set to
zero.
The active phase calculation occurs when the engine is
running and the vehicle is stopped (when the vehicle is not
...
Immobilizer override procedure
This procedure makes it possible to "temporarily" turn on the motorcycle if
the hf (hands free) system is not working.
Note
The pin code function must be activated by entering your 4 digit pin in
the dashboard, otherwise the vehicle cannot be
turned on temporarily in the case of a malfunction ...
Refitting the clutch master cylinder assembly
Insert the clutch master cylinder assembly (3) and the clamp (6) on the left
handlebar, so that the top mating faces
match the mark (z) on the handlebar as shown.
Couple terminal (6) to the clutch master cylinder control and fix them with
the screws (v).
Tighten the retaining screws ...