
Ducati Diavel Service Manual: External components
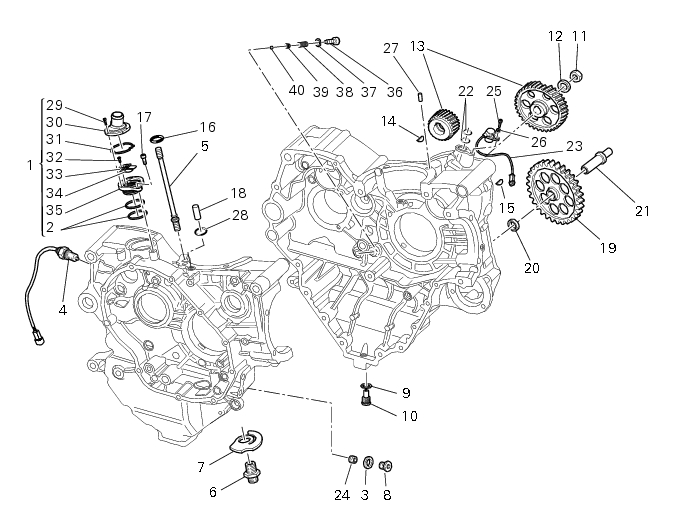
- Oil breather valve
- O-ring
- Sealing washer
- Gear position sensor
- Cylinder barrel/head stud
- Nipple
- By-pass spring
- Plug
- Plug
- Aluminium gasket
- Nut
- Lock washer
- Timing gear pair
- Key
- Key
- O-ring
- Screw
- Locating dowel
- Starter idler gear
- Washer
- Gear shaft
- O-ring
- Engine sensor
- Grub screw
- Screw
- Washer
- Locating dowel
- O-ring
- Screw
- Upper shield
- Sealing washer
- Screw
- Spacer
- Reed
- Lower shield
- Special screw
- Washer
- Spring
- Cap
- Ball
Spare parts catalogue
Diavel abs gearchange control
Diavel abs timing system
Diavel abs crankcase halves
Diavel abs crankcase halves
Diavel abs electric starting and ignition
Diavel carbon abs gearchange control
Diavel carbon abs timing system
Diavel carbon abs crankcase halves
Diavel carbon abs crankcase halves
Diavel carbon abs electric starting and ignition
Important
Bold reference numbers in this section identify parts not shown in the figures alongside the text, but which can be found in the exploded view diagram.
- Removing outer components
- Refitting the external components
- Removal of the timing gears
- Refitting the timing gears
- Removal of the starter motor idler gear
- Refitting the starter motor gear

 Removing outer components
Note
The following removal operations are required in order to renew and/or
clean the crankcase halves. If the original
crankcase halves are to be reused, then the removal of these components ...
Other materials:
Overhaul of the crankcase halves
Carefully examine the engine crankcase halves.
Check that the surfaces of the crankcase halves are perfectly flat using a
reference surface.
Check that the bearings (1) and (18), and the bushings (2) and (17) are in
optimum conditions. Note that the main
bearings must always be changed in p ...
Setting menu
This menu is used to enable/disable and set some
motorcycle functions.
To access the "setting menu" press the button (2, fig. 14)
? for 3 seconds.
Note
When within this menu no other function can be
displayed.
Important
For safety reasons, the setting menu can only be
ac ...
Refitting the silencer
Position the silencer guard (41) and fix it by starting the screws (40).
Tighten the screws (40) to a torque of 8 nm +/- 10% (sect. 3 - 3, Frame torque
settings).
Insert the silencer (4) into the central exhaust pipe (26), and fix it to the
vehicle by starting the screw (1).
Hold the ...