
Ducati Diavel Service Manual: Fault indication
The dds (diagnosis ducati system) indicates all active errors and all inactive but stored errors gathered by the bbs. A simplified summary of the active errors is also shown in the master dashboard service display when the dashboard is switched on. Simultaneously, the eobd warning light is also activated, independently of the types of the errors themselves. In the event of more than one active error, the errors are shown cyclically on the service display for 3 seconds each.
In the event of a can line fault (can off), the dashboard cannot transmit data and the electrical system behaves as follows:
- The dashboard service display shows the message "can error"
- All lights on the handlebar dashboard must light up and flash
- The turn indicators are flashing
- The dds shows the message "can diagnosis bus off"
If the can line fault is no longer present (fault resolved), normal operation is resumed and the can error disappears from the tank dashboard.
Other faults relative to the can line and indicated on the tank dashboard and by activation of the eobd warning light, are described as follows:
- Device ecu the ecu node (engine control unit) is not recognised by the network or is not communicating with the network. In this case, the dds may display the following messages relative to ecu function diagnosis: ecu counter, ecu no frame, ecu not compatible
- Device dashboard (there are two dashboards: master and slave dash boards) the dashboard node is not recognised by the network or is not communicating with the network. In this case, the dds may display the following messages relative to dashboard function diagnosis: dashboard counter, dashboard no frame, dashboard not compatible
- Device hands free the hands free node (facilitated keyless start system) is not recognised by the network or is not communicating with the network. In this case, the dds may display the following messages relative to hands free function diagnosis: hands free counter, hands free no frame, hands free not compatible
- Device abs error
- Bbs/dtc device this message is transmitted by the engine control unit to the dashboard and indicates that the bbs is not recognised by the network or is not communicating with the network. In this case, the dds may display the following messages relative to bbs/dtc function diagnosis: bbs/dtc counter, bbs/dtc no frame
- Device sw compatibility error-unknown device the bbs detects an incompatible device
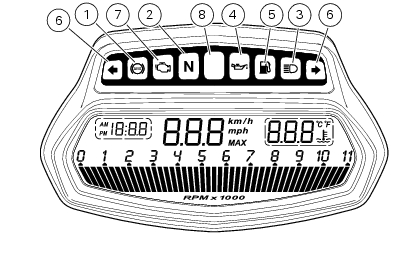
Dashboard warning and indicator light key (some of these are used to indicate faults in the electric - electronic system):
- Abs light;
- Neutral warning light;
- High beams;
- Oil pressure warning light;
- Fuel range;
- Turn indicator light;
- Eobd warning light;
- Over rev light (dtc intervention).
Warning
When diagnosing one of more elements in the electric - electronic system, also check that there are no error codes indicating can line faults. If any error codes relative to can line faults are noted, the relative fault must always be resolved as it may be correlated with other specific faults.
 On-board computers and the can line
The following on-board computers make up the electrical system of the diavel
and are connected with each other via the
can line (or network):
Master dashboard
Slave dashboard
Hands free (fa ...
 Operating principle of dtc
The bbs receives the front and rear speed information from the abs over the
can. Then, the bbs sends the vehicle speed
information to be displayed on the dashboard over the can.
If the tangentia ...
Other materials:
Default function (resetting ducati default parameters)
This function resets the parameters set by ducati for each riding style.
To access the function it is necessary to view the ""setting" menu", using
buttons (1) "s" or (2) "t" select the "riding
mode" function and press the reset button (3) to enter the following page.
Use button (1) "s" or ...
Residual range indication when the service is due
After resetting the first oil service warning (triggered at 1000 km), upon
every key-on the system displays the
indication of which type of service should be performed next (oil service or
desmo service) and the residual range.
A (green) warning (1) is activated for 2 seconds on every key-on ...
On-board computers and the can line
The following on-board computers make up the electrical system of the diavel
and are connected with each other via the
can line (or network):
Master dashboard
Slave dashboard
Hands free (facilitated keyless start system)
Ecu (engine control unit)
Bbs (black box system or central elect ...