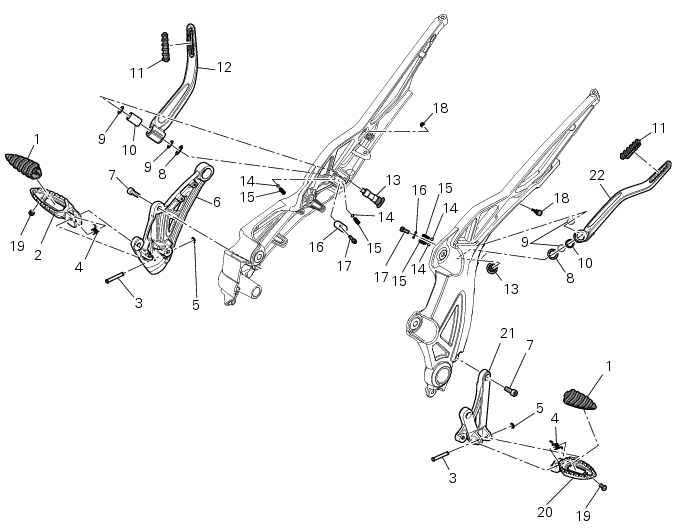
Ducati Diavel Service Manual: Footrest brackets

- Rubber footrest
- Right front footrest
- Pin
- Spring
- Circlip
- Right footrest bracket
- Screw
- Washer
- O-ring
- Bush
- Rubber pad
- Right rear footrest
- Pin
- Ball
- Spring
- Plate
- Screw
- Vibration damper mount
- Special screw
- Front lh footrest
- Left footrest bracket
- Left rear footrest
Spare parts catalogue
Diavel abs r.H. Footrests
Diavel abs l.H. Footrests
Diavel carbon abs r.H. Footrests
Diavel carbon abs l.H. Footrests
Important
Bold reference numbers in this section identify parts not shown in the figures alongside the text, but which can be found in the exploded view diagram.
- Removal of the front footrests
- Refitting the front footrests
- Removing the front footrest brackets
- Reassembling the front footrest brackets
- Reassembling the front footrest brackets
- Removing of the rear footrests
- Refitting the rear footrests
 Lubricating the chain
O-ring chains have sealed, life-lubed link studs and bushes. However, these
chains need lubricating at regular intervals to
protect metal parts of the chain and the o-rings.
Lubrication also ser ...
 Removal of the front footrests
Note
The removal of the front footrests is described only for the right one (2)
but it is the same also for the left one.
Remove the circlip (5) by releasing the pin (3).
Slide the pin (3) off ...
Other materials:
Front brake lever
Pull the lever (1, fig. 94) Towards the twistgrip to operate the
front brake. The system is hydraulically assisted and you only
need to pull the lever gently.
The control lever (1, fig. 94) Features a dial adjuster (2, fig. 94)
For lever distance from the twistgrip on handlebar
adjustment.
...
Recovery procedure in the event of electric steering lock fault
If any fault occurs during activation of the electric steering lock: for
example, if the pin jams, if the handlebar is moved
while the pin is deployed or if there is excessive strain on the electric pin
actuator motor, the electric steering lock is
automatically disengaged and the hands free s ...
Removal of the gear selector lever
Unscrew and remove the fixing screws (18) and (20) of the complete gear
selector lever (21) and collect the spacer (19).
Remove the gearchange mechanism complete with the shaft, spring, and stop plate.
Important
Visually inspect the gear selector claw (14) for wear, particularly aroun ...