
Ducati Diavel Service Manual: Frame inspection
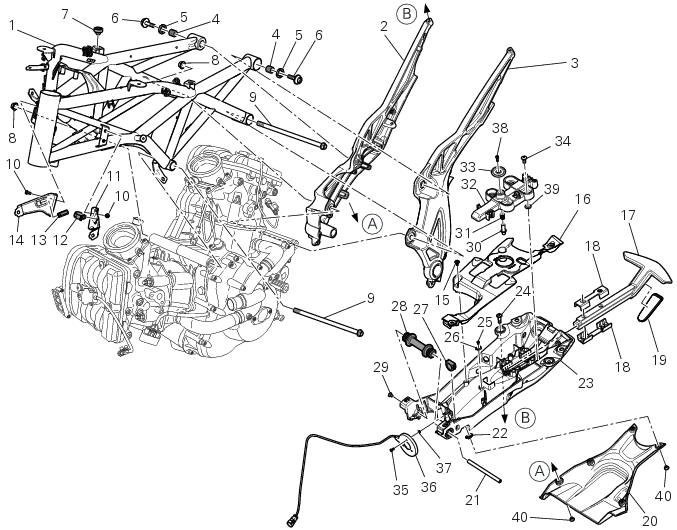
- Frame
- Rh subframe
- Lh subframe
- Grub screw
- Nut
- Special screw
- Rubber pad
- Nut
- Special screw
- Screw
- Left-hand bracket
- Hose clip
- Hose clip
- Right-hand bracket
- Special screw
- Cover
- Handgrab
- Slider
- Reflector (rear)
- Splashguard
- Pin
- Clip nut
- Tool tray
- Screw
- Screw
- Base
- Cable grommet
- Rubber support
- Screw
- Pin
- Spring
- Block
- Nut
- Screw
- Screw
- Immobilizer antenna
- Nut
- Screw
- Washer
- Screw
Spare parts catalogue
Diavel abs frame
Diavel abs rear subframe
Diavel carbon abs frame
Diavel carbon abs rear subframe
Important
Bold reference numbers in this section identify parts not shown in the figures alongside the text, but which can be found in the exploded view diagram.
- Disassembly of structural components and the frame
- Removal of the tool tray
- Removing the frame and the lateral footrests
- Checking the frame
- Reassembly of structural components and the frame
- Reassembling the frame and the lateral footrests
- Reassembly of the tool tray
 Refitting the side stand
Place the stand plate on the rear shock absorber support; bring adjuster (14)
in line with bracket (s) and start the screw
(12) in the nut behind the bracket (s).
Insert the screws (11), (3) and ...
 Disassembly of structural components and the frame
Before carrying out dimensional checks on the frame, you must remove all the
superstructures fitted, referring to the
removal procedures outlined in the sections of this manual.
The rear subfram ...
Other materials:
Abs system operating information
The response of the system is based on the analysis of the speed signals for
front and rear wheels; the system is
automatically deactivated if either of these signals is missing.
Note
In the event of the abs control unit detecting a fault in the abs
electronic management system, it activates ...
Checking the frame
Check the dimensions of the frame against the dimensions shown here to
determine whether it needs to be realigned or
renewed.
Important
Damaged frames must be changed, not repaired. Any work carried out on the
frame can give rise to potential danger,
infringing the requirements of ec directi ...
Refitting the rear wheel eccentric hub and rear wheel shaft
Refitting is the reverse of removal, with attention to the following points.
If the calliper bracket locating pin (14) was removed, apply the recommended
threadlocker on reassembly.
Tighten the pin (14) to the torque of 33 nm +/- 5% (sect. 3 - 3, Frame torque
settings).
If previously ...