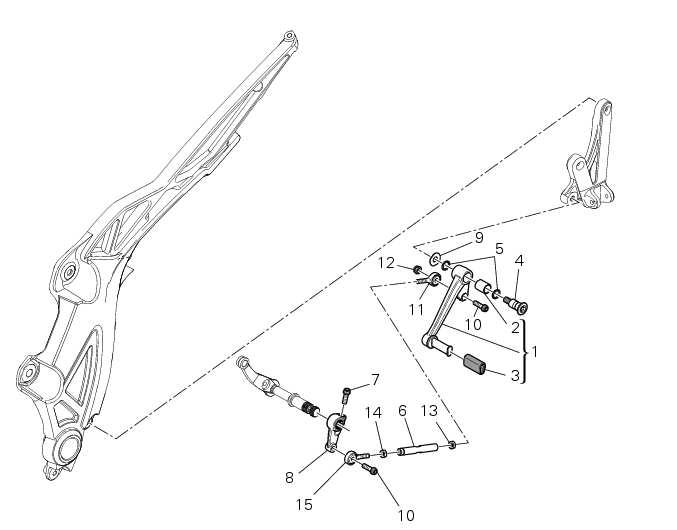
Ducati Diavel Service Manual: Gearchange mechanism

- Gearchange pedal
- Bush
- Rubber pad
- Pin
- O-ring
- Gearchange lever tie-rod
- Screw
- Gearchange lever
- Washer
- Screw
- Ball joint
- Nut
- Nut
- Nut with left-hand thread
- Lh ball joint
Spare parts catalogue
Diavel abs l.H. Footrests
Diavel carbon abs l.H. Footrests
Important
Bold reference numbers in this section identify parts not shown in the figures alongside the text, but which can be found in the exploded view diagram.
- Removal of the gearchange control
- Disassembly of the gearchange mechanism
- Refitting the gearchange mechanism
 Refitting the hands free
Reassembly is a reversal of the removal procedure: in particular apply
prescribed threadlocker to screws (2) and tighten
them to a torque of 20 nm +/- 10% (sect. 3 - 3, Frame torque settings).
I ...
 Removal of the gearchange control
Loosen and remove the pivot screw (4) securing the gearchange pedal (1) and
recover the washer (9) and the o-ring Seals (5).
Loosen and remove the screw (7) securing the gearchange lever (8 ...
Other materials:
Reassembly of the gearbox shafts
Figure 1 shows all the parts to be reassembled on the gearbox primary shaft
(2), with the calculated end shims (1) and
(11) (sec. 9 - 9.2, Reassembly of the crankcase halves).
Figure 2 shows all the parts to be installed on the gearbox secondary shaft
(25), with calculated end shims (15) a ...
Replacing the tank flange and fuel sensor
Loosen the screws (19) securing the fuel tank flange (20).
Remove the flange (20) from the tank (20).
Recover the seal (21).
Undo and remove the two fixing screws (g) and move the protection (f).
Before reassembly, carefully remove any deposits or scale from all parts.
Note
The flang ...
Throttle valve operation engine
Introduction
The electric motor actuating the throttle valve for the vertical cylinder is
mounted on the throttle body of the diavel, while
a link rod connects the vertical cylinder throttle valve to the horizontal
cylinder throttle valve. In the electric motor, the
throttle valve position se ...