
Ducati Diavel Service Manual: Headlight aim
The motorcycle must be perfectly upright with the tires inflated to the correct pressure and with a rider seated, perfectly perpendicular to the longitudinal axis.
Position the motorcycle 10 metres from a wall or a screen.
On the wall or surface, draw a horizontal line at the same height from the ground as the centre of the headlight and a vertical line aligned with the longitudinal axis of the motorcycle.
Note
If possible, perform this check in conditions of low ambient light.
Switch on the low beam. The height of the upper limit between the dark area and the lit area must not be more than nine tenths of the height of the centre of the headlight from the ground.
Note
This is the procedure specified by italian regulations for checking the maximum height of the light beam.
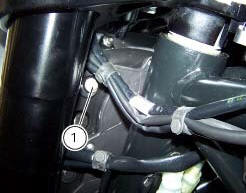
The vertical alignment of the headlamp can be adjusted manually by turning screw (1).
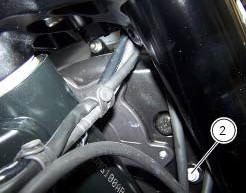
Turn the screw (2) to set beam height.
 Changing bulbs
Changing the headlight bulbs
Before replacing a burnt out light bulb, ensure that the replacement bulb has
the same voltage and power rating as
specified for the lighting device in question (sect. ...
 Indicating devices
Checking the indicating devices
In the event of a fault, the internal connections of the device must be
checked in all operating conditions. To do this, it is
necessary to disconnect the switch co ...
Other materials:
Dashboard
Note
The dashboard is supplied as a single component; its internal components
cannot be renewed separately.
Important
Whenever the dashboard is renewed, the ignition key programming procedure
must be repeated.
Loosen the nuts (2) to remove the master dashboard (1) from its seat and
disconn ...
Indicator cons. Avg - average fuel consumption
This function indicates the "average" fuel consumption.
The calculation is made considering the quantity of fuel used and the km
travelled since the last trip 1 reset. When trip 1
is reset, the value is set to zero and the first available value is shown on the
display 10 seconds after the re ...
Tips on how to select the sensitivity level
Warning
The 8 level settings of the dtc were calibrated using tyres of the
same make, model and size as those originally fitted to
the motorcycle.
The use of tyres of different size to the original tyres may alter the operating
characteristics of the system.
In the case of minor differen ...