
Ducati Diavel Service Manual: High beam flash not working - start/stop lap function not working
Fault codes
Dds: no fault code displayed.
Dashboard: no fault code displayed.
Wiring diagram
Db dashboard connection, s high beam flash button. 7 Orange - o, 1 red/blue - r/b.
Location of connections and components
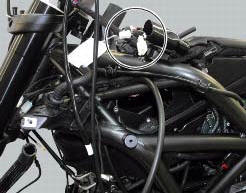
Location of left hand handlebar switchgear set connection.
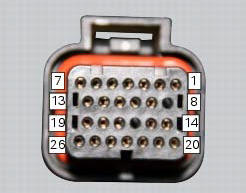
Pin numbering for wiring harness side dashboard connector.
 Turn indicators not working
Fault codes
Dds: no fault code displayed.
Dashboard: no fault code displayed.
Wiring diagram
Db dashboard connection, bbs bbs unit connection, s turn indicator button, f1
front left turn i ...
 Number plate light not working
Fault codes
Dds: no fault code displayed.
Dashboard: no fault code displayed.
Location of connections and components
Location of rear turn indicator and number plate light connection.
p ...
Other materials:
Refitting the fuel tank
If the fuel tank has been disassembled into its component parts, reposition
all the parts as shown in the exploded view.
In particular:
tighten the screws (13) to a torque of 5 nm +/-10% (sect. 3 - 3, Frame torque
settings).
Refit the tank by inserting its rear side into the pin on the ...
Front wheel
Nut
Washer
Left spacer
Sealing ring
Bearing
Front wheel rim
Inner spacer
Screw
Right spacer
Front wheel shaft
Valve
Spare parts catalogue
Diavel abs front and rear wheels
Diavel carbon
abs
front and rear wheels
Important
Bold reference numbers in this section iden ...
Lh switch
Dip switch, light dip switch, two positions (fig. 89):
(A) every time pressed down light switches from low
beam on to low beam and high beam
on .
(B) pushed to the side = high
beam flasher (flash),
"start-stop lap" function.
Button = three-position turn
indicator ...