
Ducati Diavel Service Manual: Immobilizer override procedure
This procedure makes it possible to "temporarily" turn on the motorcycle if the hf (hands free) system is not working.
Note
The pin code function must be activated by entering your 4 digit pin in the dashboard, otherwise the vehicle cannot be turned on temporarily in the case of a malfunction.
Warning
The motorcycle owner must activate (store) the pin code; if there is already a stored pin, contact an authorised ducati dealer to have the function "reset". To perform this procedure, the authorised ducati dealer may ask you to demonstrate that you are the owner of the motorcycle.
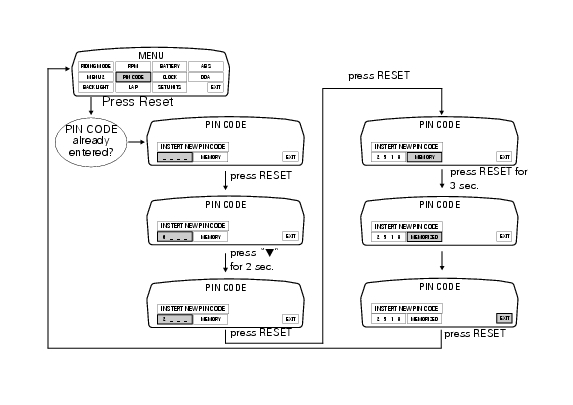
Pin code activation function to access the function it is necessary to view the "setting"menu, using buttons (1) "s" or (2) "t" to select the "pin code" function and press the reset button (3) to enter the following page.
Note
If "modify pin code" appears when accessing this function, this means that there is already a stored pin and therefore the function is already active.
When accessing the function, "insert new pin code" with four dashes "- - - -" in the bottom line will appear on the display highlighted in green; now enter a 4 digit code.
Entering the code: press the reset button (3).
Pressing button (2) "t" repeatedly cycles the highlighted number from "0" to "9" and then back to "0"; to confirm the number, press the reset button (3).
Repeat the procedure until inserting the fourth digit.
To highlight the "memory" indication, press the reset button (3) again.
To store the entered pin, press the reset button (3) for 3 seconds with "memory" indication highlighted in green.
As a confirmation of pin storage, the display will show the message "memorized" for about 2 seconds and then automatically highlight "exit" option.
From this moment, "modify pin code" will be displayed when accessing the "pin code" function and the pin can be Changed again as many times as necessary (without limits).
To exit the setting function, press the reset button (3) when "exit" is highlighted.
 Abs disabling function
This function disables or enables the abs.
To access the function it is necessary to view the ""setting" menu", using
buttons (1) "s" or (2) "t" to select the "abs"
function and press the reset ...
 Pin code change function
This function changes your four number pin code.
To access the function it is necessary to view the "setting"menu, using buttons
(1) "s" or (2) "t" to select the "pin code"
function and press th ...
Other materials:
Overhauling the rear swingarm
Inside the swingarm (8), in correspondence with the pivot point on the frame,
there is a pair of ball bearings (10) and a
spacer (11) on the rh side, and a pair of roller bearings (6), with sealing
rings (5), on the lh side.
To change the bearings, proceed as follows.
Remove the shims ( ...
Dashboard menu option scrolling not possible
Fault codes
Dds: no fault code displayed
Dashboard: no fault code displayed
Location of connections and components
Location of left hand handlebar switchgear set connection.
Pin numbering for wiring harness side dashboard connector. ...
Changing bulbs
Changing the headlight bulbs
Before replacing a burnt out light bulb, ensure that the replacement bulb has
the same voltage and power rating as
specified for the lighting device in question (sect. 3 - 1.1, Lights/instrument
panel).
Warning
The halogen light bulbs in the headlight become hot ...