
Ducati Diavel Service Manual: Indicator air - air temperature
This function shows the external temperature.
Display limits: -39C - +124C
In the event of a sensor fault (-40C, +125C or disconnected), a string of dashes "- - -" (not flashing) is displayed and the "vehicle/engine diagnosis - eobd" light comes on.

Note
When the vehicle is stopped, the engine heat could influence the displayed temperature.
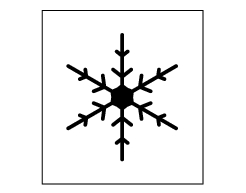
When the detected temperature drops to 4C (39f), the display warns that the formation of ice is possible. The indication turns off when the temperature rises to 6C (43f).
Warning
This warning does not exclude the possibility of icy road sections even at temperatures above 4C (39f); when external temperatures are "low" it is always recommended to ride carefully, particularly on sections that are not exposed to the sun and/or on bridges.
 Indicator trip time - trip time
This function shows the vehicle trip time.
The calculation is made considering the time travelled since the last trip 1
reset. When trip 1 is reset, the value is set to
zero.
The active phase ...
 Engaged gear indicator
This function displays the gears (1).
The dashboard receives information and indicates the engaged gear or "n" for
neutral.
In the case of a gear sensor "error", a dash "-" (not flashing) will ...
Other materials:
Checking the fuses
The main fuse box (1) and the secondary one (2) are located in the tool tray;
to reach the fuse box remove the seat as
specified under sect. 5 - 3 "Removal of the seat".
The fuses are accessed by removing the cover, which shows the ampere ratings and
mounting locations.
For ampere ratings ...
Dashboard system
The vehicle is equipped with two dashboards: an lcd (1) located on the
handlebar containing the key indications (speed,
rpm, engine coolant temperature, and clock) and a tft colour display (2) located
in the tank fairing displaying trip
information (riding style set, odometer, consumption, ave ...
Removal of the gearchange control
Loosen and remove the pivot screw (4) securing the gearchange pedal (1) and
recover the washer (9) and the o-ring Seals (5).
Loosen and remove the screw (7) securing the gearchange lever (8) to the gear
selector shaft.
Withdraw the lever (8) complete with the gearchange control assem ...