
Ducati Diavel Service Manual: Inspecting the final drive
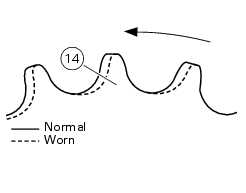
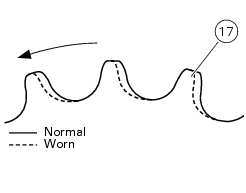
To check the wear of the final drive, visually check the pinion (14) and sprocket (17). If the teeth are found to worn as shown in the figure (dotted line), the sprocket must be renewed.
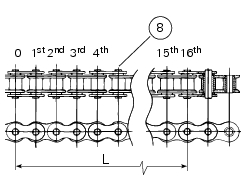
To check the amount of wear on the chain (8), keep the chain taut and measure 16 links.
If the length (l) is greater than 256.5 Mm, the chain should be replaced.
Important
The sprocket (17), engine pinion (14) and chain (8) must all be replaced together as a set.
 Final drive
Circlip
Nut
Washer
Nut
Rear sprocket flange
Cush drive bush
Inner ring
Chain
Spacer
Chain cover
Screw
Nut
Lock washer
Front sprocket
Spacer
O-ring
Rear sprocket
...
 Removing of the front sprocket
Undo the screws (11) and remove the chain cover (10).
Loosen the chain (sect. 4 - 3, Adjusting the chain tension).
Remove the chain with the tool code 88713.1344.
The tool is composed of a ...
Other materials:
Checking the battery charging system
To check the current flow of the recharging circuit, use the "dds" diagnosis
instrument, which is equipped with an
inductive clamp-type amperemeter: refer to chapter "testing the battery charging
system", sect. 6 - 11
With the dds diagnosis instrument you can determine the engine rpm required ...
Cylinder compression test
Note
The on-screen icons used during this procedure are explained in a table at
the end of this section.
Engine performance is directly correlated to the pressure that can be
measured in the combustion chambers of the two
cylinders. Pressure which is too high/low or an excessive difference be ...
Removal the airbox and throttle body
Loosen the screws (a) and remove the plate (b) that fixes the main wiring to
the airbox.
Undo the screws (17) and remove the air pressure sensors (9) with the support
(19).
Release the hoses (c) of the air pressure sensors (9) from the tab (d) on the
airbox.
Operating on the ...