
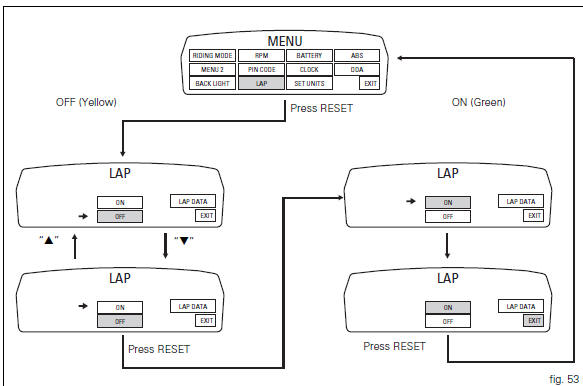
Ducati Diavel Owners Manual: Lap activation/deactivation function (lap time)
This function activates and deactivates the lap function (lap time).
To access the function it is necessary to view the "setting" menu page 48, using
button (1, fig. 14) ?"
" or (2, fig. 14) ?" " select the "lap" function and
press the reset button
(12, fig. 12) To go to next page.
Function state is highlighted on the display (on in green or off in yellow); use
button (1, fig. 14) ?"
" or (2, fig. 14) ?" "
"
to shift the arrow on the left onto the new setting and
confirm by pressing the reset button (12, fig. 12).
To exit the setting function, press the reset button (12, fig.
12) Where "exit" is highlighted.
Storing the "off" condition disables the lap function.
Storing the "on" condition enables the lap function (see "lap registration" paragraph).
 Note
Note
When the "lap" function is active, the flash button (11, fig. 12) Takes on the dual function of high beam headlight "flash" and lap time start / stop.
 Digital rpm indication function
This function displays the number of rpms for improved
accuracy when setting idle rpm.
To access the function it is necessary to view the "setting" menu page 48, using
button (1, fig. ...
 Lap registration function
This function describes the "lap" time registration.
If the function is activated (see "lap activation/deactivation
description), the lap time can be registered as follows:
Pres ...
Other materials:
Airbox - throttle body
Airbox
O-ring
Injector
Throttle body assembly
Screw
Clamp
Intake manifold
Screw
Pressure sensor
Screw
Clamp
Hose
Sealing washer
Intake manifold
Sealing washer
Screw
Screw
Spacer
Bracket
Rubber pad
Clamp
Hose
Clamp
Union
Washer
Hose
Cable gro ...
Refitting the front sprocket
Grease the o-ring (16) and install it on the front sprocket spacer (15).
Fit the spacer, from the o-ring side, on the secondary shaft and drive it fully
home against the inner ring of the bearing.
Check that the splines of the gearbox secondary shaft and the sprocket are in
perfect condi ...
Anti-pollution system and auto-adaptive strategy
Efficacy of the catalytic converter and oxygen sensors
To comply with current emissions legislation, the diavel is equipped with a
trivalent catalytic converter, which oxidises co
(carbon monoxide) and hc (unburnt hydrocarbons) and reduces nox (nitrogen
oxides).
The image shows the exhaus ...