Ducati Diavel Owners Manual: Lap registration function
This function describes the "lap" time registration.
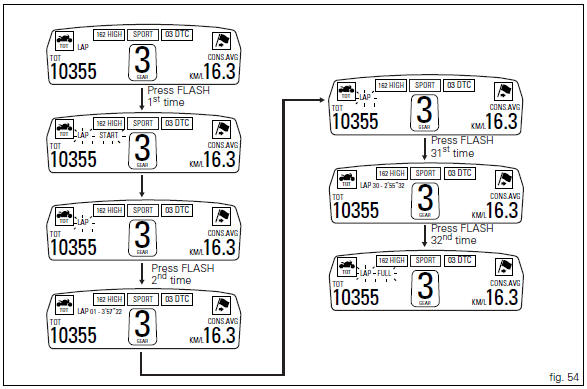
If the function is activated (see "lap activation/deactivation description), the lap time can be registered as follows:
- Pressing the flash headlight button (11, fig. 12) The first time starts the "lap timer" for the first lap, and the instrument panel shows the message "lap-start" flashing for 4 seconds, and then returns to the previous display;
- From this moment, each time that the flash is pressed (11, fig. 12) The display automatically shows the lap number and lap time for 10 seconds and then returns to the "previous" display.
You can save a maximum of 30 laps in the memory.
Once the memory is full, the instrument panel no longer stores lap times when the flash headlight button (11, fig. 12) Is pressed, and the flashing message "lap-full" is shown on the display for 4 seconds until the times are reset.
When the lap function is set disabled, the current "lap" is not stored.
If the lap function is active and suddenly the motorcycle is suddenly turned off (key-off), the function will be automatically disabled (even if the lap timer was active, the current "lap" is not stored).
If the time is never "stopped", it will roll over upon reaching 9 minutes, 59 seconds and 99 hundredths; the lap timer starts counting from 0 (zero) and will keep running until the function is disabled.
If however the lap function is switched on and the memory has not been cleared, but fewer than 30 laps have been saved (e.G. 18 Laps), the instrument panel will store any remaining laps until the memory is full (in this case, it will store an additional 12 laps).
This function only displays the times for the lap being registered; but other data are also saved (max speed and max rpm) for viewing at a later date in the "lap data" function (stored lap display).

 Lap activation/deactivation function (lap time)
This function activates and deactivates the lap function (lap
time).
To access the function it is necessary to view the "setting" menu page 48, using
button (1, fig. 14) ?"
&quo ...
 Stored lap display function
This function displays the stored laps.
To access the function it is necessary to view the "setting" menu page 48, using
button (1, fig. 14) ?"" or (2, fig.
14) ?" &quo ...
Other materials:
Fairings
Rh front half-fairing
Clip
Screw
Right-hand support
Screw
Screw
Rh air inlet
Lh air inlet
Screw
Clip
Left-hand support
Lh front half-fairing
Lh tank fairing
Screw
Nylon washer
Special screw
Washer
Spacer
Spring
Rubber pad
Rh tank fairing
Tank fairing
...
Abs system operating information
The response of the system is based on the analysis of the speed signals for
front and rear wheels; the system is
automatically deactivated if either of these signals is missing.
Note
In the event of the abs control unit detecting a fault in the abs
electronic management system, it activates ...
Checking and adjusting the valve clearances
Note
For clarity, the figures show the engine removed from the frame.
Move the piston of the cylinder being checked to tdc of the power stroke: in
this condition, all the valves are closed and
the timing shafts come in neutral position and, therefore, free to rotate; check
to the valve cl ...