
Ducati Diavel Owners Manual: Lh switch
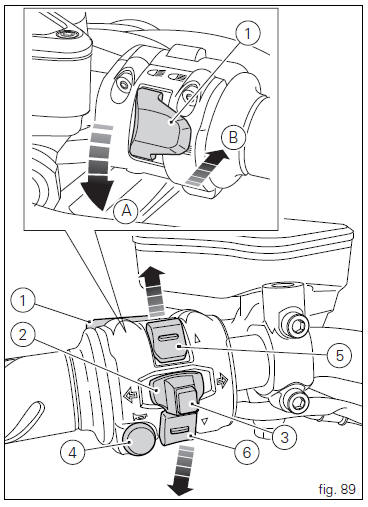
- Dip switch, light dip switch, two positions (fig. 89):
(A) every time pressed down light switches from low
beam on
 to low beam and high beam
on .
.
(B) pushed to the side
 = high
beam flasher (flash), "start-stop lap" function. - Button
 = three-position turn
indicator (fig. 89): Centre position = off;
Position  = left turn;
Position  = right turn.
- Turn indicator off, "riding style" activation and menu navigation button.
- Button
 = warning horn.
 - Navigation menu, display scroll and trip1 and trip2 reset button.
- Navigation menu, display scroll button.
 Entering pin code function for vehicle release
This function turns on the motorcycle "temporarily" in the
case of hf (hands free) system "malfunctions".
To activate the function, press the "emergency" hands free
...
 Clutch lever
Lever (1) disengages the clutch. It features a dial adjuster (2)
for lever distance from the twistgrip on handlebar.
The lever distance can be adjusted through 10 clicks of the
dial (2). Turn clo ...
Other materials:
Overhauling the rear swingarm
Inside the swingarm (8), in correspondence with the pivot point on the frame,
there is a pair of ball bearings (10) and a
spacer (11) on the rh side, and a pair of roller bearings (6), with sealing
rings (5), on the lh side.
To change the bearings, proceed as follows.
Remove the shims ( ...
Total distance covered indicator: "odometer"
This function shows the total distance covered by the vehicle (in km or miles
depending on the specific application).
At key-on the system automatically enters this function.
The odometer reading is stored permanently and cannot be reset.
If the distance travelled exceeds 199999 km (or 19 ...
Location of elements on motorcycle
(A) injection relay; (b) etv relay (throttle valve operating engine); (c)
radiator fan relay; (d) hands free relay.
(E) ecu; (g) bbs (black box system or central electronics); (f) abs hydraulic
unit with integrated control unit.
Fuses located at the rear left of the vehicle.
...