Ducati Diavel Owners Manual: Lubricating cables and joints
Check the outer sheath of the throttle control and cold start lever cables for damage at regular intervals. The outer plastic cover should not be flattened or cracked. Operate the controls to make sure the inner cables slide smoothly inside the outer sheath: if you feel any friction or catching, have the cable replaced by a ducati dealer or authorised service centre.
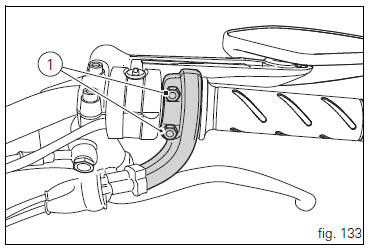
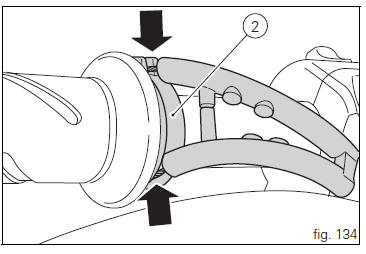
To avoid this kind of problem with the throttle cable, unscrew the two retaining screws (1, fig. 133) To open the case and then the grease cable ends and pulley (2, fig. 134) With shell advance grease or retinax lx2 grease.
 Warning
Close the twistgrip housing carefully, inserting the cable in the pulley.
Refit the housing and tighten the screws (1) to 10 nm.
To ensure smooth operation of the side stand pivot, remove dirt and apply shell alvania r3 grease to all friction points.


 Checking brake pads for wear
Check brake pads wear through the inspection hole in the
callipers.
Change both pads if friction material thickness of even just
one pad is about 1 mm.
Warning
Friction material wear beyond th ...
 Adjusting throttle control free play
The throttle twistgrip must have free play of 1.5×2.0 Mm in
all steering positions, measured on the outer edge of the
twistgrip. If necessary, adjust it using the adjusters (1 and 2,
fig. 135 ...
Other materials:
Filling the clutch circuit
Warning
Clutch fluid will damage painted surfaces if spilled on them. It is
also very harmful if it comes into contact with the skin or
with the eyes; in the case of accidental contact, wash the affected area
thoroughly with plenty of running water.
Remove cover (1) and membrane from the clut ...
Tft - parameter setting/display
Warning
Any adjustments to the dashboard must only be carried out when the
motorcycle is stationary. Never operate the
dashboard controls while riding the motorcycle.
At the end of the check, the dashboard always displays as the "main"
indication the odometer (tot) on the left and the
averag ...
Evaporative emissions canister
Sealing washer
Union
Hose clip
Hose
Clamp
"T" fitting
Hose
Support
Special screw
Rubber mounting
Hose
Hose clip
Evaporative emissions canister
Hose
Spring
Spare parts catalogue
Diavel abs evaporative emissions canister
Diavel carbon
abs
evaporative emissions ...