
Ducati Diavel Service Manual: Menu 2 on/off function
This function turns off and back on the menu 2.
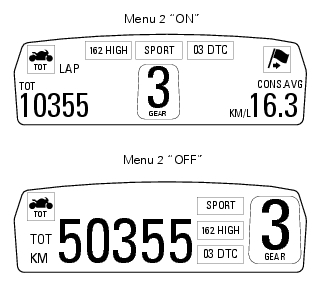
If menu 2 is disabled, the functions for average fuel consumption (cons.Avg), instantaneous fuel consumption (cons.), Average speed (speed avg), trip time (trip time) and air temperature (air) will no longer be displayed in the "main screen". Nevertheless, all these functions will keep on their counters so that when menu 2 is re-enabled data will be updated and consistent.
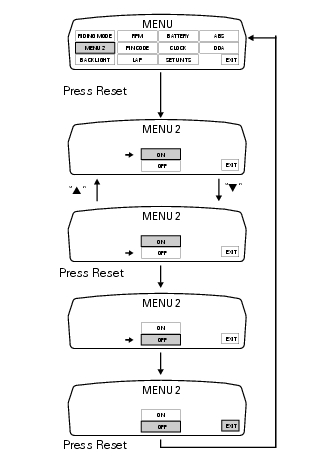
To access the function it is necessary to view the ""setting" menu", using buttons (1) "s" or (2) "t" select the "menu 2" function and press the reset button (3) to enter the following page.
Function state is highlighted on the display (on in green or off in yellow); use button (1) "s" or (2) "t" to shift the arrow to the left onto the new setting and confirm by pressing the reset button (3).
To exit the setting function, press the reset button (3) when "exit" is highlighted.
 Default function (resetting ducati default parameters)
This function resets the parameters set by ducati for each riding style.
To access the function it is necessary to view the ""setting" menu", using
buttons (1) "s" or (2) "t" select the "riding
...
 Background setting function for the dashboard on tank - dashboard 1
This function allows setting the "background" of the dashboard on tank.
To access the function it is necessary to view the ""setting" menu", using
buttons (1) "s" or (2) "t" select the "back
lig ...
Other materials:
Exhaust system
Screw
Bush
Vibration damper mount
Silencer
Washer
Screw
Bracket
Nut
Nut
Upper heat guard
Screw
Washer
Central heat guard
Spacer
Clip nut
Long exhaust spring
Plug
Sealing washer, thickness 1
Vertical exhaust pipe
Lambda sensor
Nut
Vertical flange
Exh ...
Information about the model
Identification data
Diavel identification data
Each ducati motorcycle has two identification numbers -the frame number and
the engine number- and an ec nameplate
(a) (not present on the us version).
Note
Please quote these numbers, which identify the motorcycle model, when
ordering spare pa ...
Air intake
Air filter
Right air duct
Screw
Air temperature sensor
Screw
Left air duct
Sealing washer
Threaded insert
Spacer
Clamp
Breather hose
Spare parts catalogue
Diavel abs air intake - oil breather
Diavel carbon
abs
air intake - oil breather
Important
Bold reference num ...