
Ducati Diavel Service Manual: Passive key
Introduction
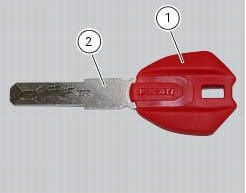
The passive key (1) is used when the active key is not working correctly or is not available.
The passive key works as a transponder, and must therefore be placed physically onto the antenna to work.
The mechanical part (2) of the key is used to open the seat or the tank plug.
Wiring diagram
No wiring diagram is available for the component
Error codes
"Key diagnosis" error: "wrong key". The key has been detected but is not associated with the hands free system. The fault can only be viewed from the dds after switching the dashboard on with the pin code.
- Check that the key is correct.
- Reprogramme the key
- If none of the tests described above identify the problem, replace the hands free system
"Key diagnosis" error: "encryption error". The encrypted code stored in the key is not recognised by the hands free system. The fault can only be viewed from the dds after switching the dashboard on with the pin code.
- Check that the key is correct.
- Check that the key is not damaged.
- Check that the antenna is working correctly.
- Reprogramme the key
- If none of the tests described above identify the problem, contact ducati
Electrical characteristics and checking component
The component has no specific electrical characteristics and requires no special checks.
In the event of fault
In the event of a fault, try reprogramming the key.
Component replacement methods
The component does not require replacement.
 Active key
Introduction
The active key (1) communicates with the hands free system by radio. In order
to function, the key must be within a 1.5
Metre radius from the antenna (located in the document compartm ...
 Programming/reprogramming keys
The dds diagnosis instrument is required in order to programme/reprogramme
the keys. The key programming procedure
is launched from this instrument.
To start the key programming/reprogramming pr ...
Other materials:
Operating principle and characteristics of the ride-by-wire system
The engine control system of the diavel uses a ride-by-wire system with
motorised throttle valves. This eliminates all
direct connection with metal cables between the throttle grip and the throttle
valves themselves. Cables are used to
rotate the aps potentiometer, which generates an electric ...
Removal of the engine
In order to remove engine you must first remove a series of other components
from the motorcycle.
Most of these removal procedures are described in the relative sections of this
manual.
The following flow chart illustrates the logical sequence in which the parts are
to be removed from th ...
Side stand
Important
Before lowering the side stand, check that the ground
is sufficiently even and firm.
Do not park on soft or pebbled ground or on asphalt melted
by the sun heat and similar or the motorcycle may fall over.
When parking on a slope, always park with the rear wheel on
the downhill sid ...