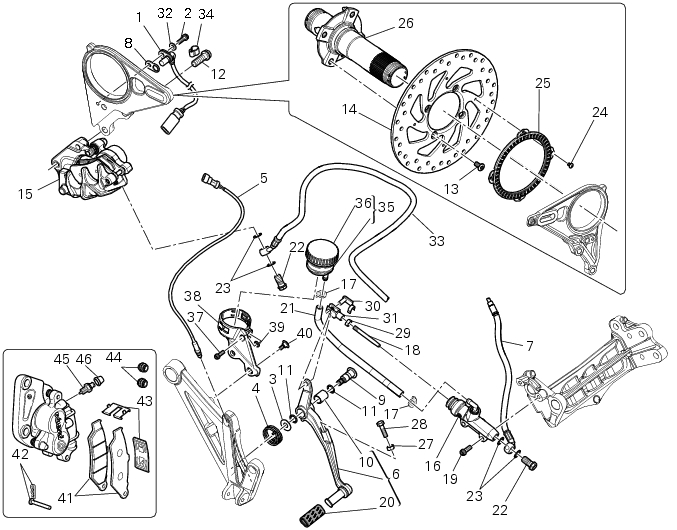
Ducati Diavel Service Manual: Rear brake

- Rear speed sensor (abs)
- Screw
- Washer
- Spring
- Brake switch (rear)
- Brake lever (rear)
- Rear pump - control unit pipe
- Sealing washer
- Pin
- Bush
- O-ring
- Screw
- screw
- Rear brake disc
- Rear brake calliper
- Rear brake master cylinder
- Hose clip
- Pushrod
- Screw
- Rubber pad
- Hose
- Special screw
- Sealing washer
- Screw
- Phonic wheel
- Rear wheel shaft
- Nut
- Screw
- Nut
- Quick-release fastener
- Fork
- Washer
- Control unit - rear calliper pipe
- Cable grommet
- Fluid reservoir assembly
- Plug
- Screw
- Support
- Spacer
- Screw
- Pair of brake pads
- Spare clip pins
- Clip spring
- Boot
- Bleed valve
- Dust cap
Spare parts catalogue
Diavel abs rear brake
Diavel abs antilock braking system (abs)
Diavel abs rear wheel axle
Diavel carbon abs rear brake
Diavel carbon abs antilock braking system (abs)
Diavel carbon abs rear wheel axle
Important
Bold reference numbers in this section identify parts not shown in the figures alongside the text, but which can be found in the exploded view diagram.
- Removing of the rear brake control
- Disassembly of the rear brake control
- Refitting the rear brake control
- Removal of the rear brake calliper
- Removal of the rear brake disc
- Refitting the rear brake calliper
 Refitting the front brake system
While refitting the system, pay special attention to the orientation of the
pipe couplings (24) on the pump and the pipes
(13) and (20) on the callipers (9) and (18).
Warning
If incorrectly posit ...
 Removing of the rear brake control
Warning
The brake master cylinder manufacturer advises against servicing the
brake master cylinder due to the safety critical
nature of this component.
Incorrect overhaul can endanger the rider ...
Other materials:
Parking
Park the stopped motorcycle on the side stand.
Turn the handle completely to the left or right.
If this operation is performed within 60 seconds after the
engine stop, the message "waiting for lock" (fig. 120) Will
appear on the display of the instrument panel for approx.
5 Seco ...
Refitting the front wheel
When all the necessary inspections have been completed, refit the wheel as
follows.
Fit the spacers (3) and (9) to the seal rings on the sides of the wheel hub.
Install the complete wheel between the fork legs.
Lubricate the shank and thread of the wheel axle (10).
Take the pin ...
Tool kit and accessories
The tool kit (2) is located under the seat (1) while the owner’s
manual is housed in the compartment under the seat.
The tool kit includes:
Fuse pliers;
Two helmet anti-theft cables;
Screwdriver;
Screwdriver handle;
14/16 Mm box wrench;
6 Mm rod;
3 Mm allen wrench;
4 Mm allen ...