
Ducati Diavel Service Manual: Reassembling the front footrest brackets
To remove the front rh footrest bracket (6) it is necessary to remove the rear brake master cylinder reservoir (by leaving it connected to the braking system), and the rear brake lever from the bracket (sect. 7 - 4, Removing of the rear brake control).
To remove the front rh footrest bracket (6) it is also necessary to remove the rh silencer support from the bracket
(Sect. 8 - 8, Removal of the exhaust system).
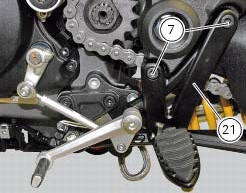
To remove the front lh footrest bracket (21) it is necessary to remove the gearchange lever from the bracket (sect. 7 - 9, Removal of the gearchange control).
Loosen the screws (7) and remove the brackets (6) and (21).
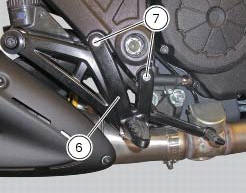
 Removing the front footrest brackets
Note
The assembly of the front footrests is described only for the right one
(2) but it is the same also for the left one.
Place the spring (4) bringing the end (a) onto the footrest (2).
Place ...
 Reassembling the front footrest brackets
To reassemble the brackets (6) and (21) carry out the removal procedure in
the reverse order; tighten the screws (7) to a
torque of 25 nm +/- 10% (sect. 3 - 3, Frame torque settings).
...
Other materials:
Refitting the rear mudguard
Place the rear mudguard (8) on the swingarm, fitting the screws (9) with
recommended threadlocker.
The screw (9) in the bottom hole of the rear mudguard (8) must be installed with
the washer (r).
Tighten the screws (9) to a torque of 5 nm +/- 10% (sect. 3 - 3, Frame torque
settings).
...
Removal of the swingarm
Before removing the parts in question, you must first carry out the following
operations:
Remove the rear wheel eccentric hub as described in chapter "removal of the
rear wheel eccentric hub and rear wheel
shaft" of this section.
Loosen screws (7) and remove the hose grommets (13), (15) ...
Refitting the alternator-side crankcase cover
Before the assembly make sure that the water pump unit is fitted on the
generator cover (sect. 9 - 3.3, Refitting the
water pump).
If bearing (27) has been removed, lubricate its seat with specified grease to
fit it on the generator cover (13).
Fit bearing completely in its seat and orien ...