
Ducati Diavel Service Manual: Reassembly of the gearbox
To refit the gearbox components follow the procedure under sect. 9 - 9.2, Reassembly of the crankcase halves, relating to reassembly of the engine crankcase.
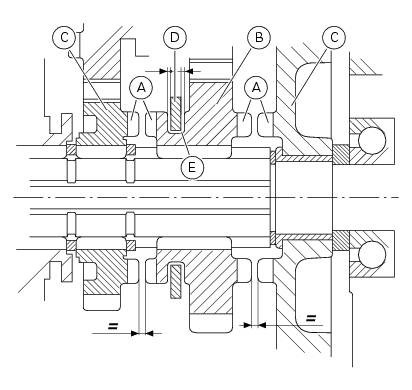
As a final practical test, ensure that with the gearbox in neutral the front coupling dogs (a) of sliding gears (b) are equidistant on both sides with respect to the corresponding coupling dogs on the fixed gears (c).
Check also that there is always a small amount of clearance between fork (d) and relative groove (e) on sliding gear (b) when engaging the gears.
 Reassembly of the gearbox shafts
Figure 1 shows all the parts to be reassembled on the gearbox primary shaft
(2), with the calculated end shims (1) and
(11) (sec. 9 - 9.2, Reassembly of the crankcase halves).
Figure 2 shows a ...
 Flywheel - alternator
Screw
Alternator stator
Plug
Sealing ring
O-ring
Cover
Screw
Aluminium gasket
Screw
Bracket
Locating bush
Screw
generator cover
Flange
Flanged nut
Plane washer
F ...
Other materials:
Throttle valve operation engine
Introduction
The electric motor actuating the throttle valve for the vertical cylinder is
mounted on the throttle body of the diavel, while
a link rod connects the vertical cylinder throttle valve to the horizontal
cylinder throttle valve. In the electric motor, the
throttle valve position se ...
Refitting the clutch master cylinder assembly
Insert the clutch master cylinder assembly (3) and the clamp (6) on the left
handlebar, so that the top mating faces
match the mark (z) on the handlebar as shown.
Couple terminal (6) to the clutch master cylinder control and fix them with
the screws (v).
Tighten the retaining screws ...
Removing outer components
Note
The following removal operations are required in order to renew and/or
clean the crankcase halves. If the original
crankcase halves are to be reused, then the removal of these components is not
essential.
Unscrew the screw (17) and remove the oil breather valve (1) with the o-rings
...