
Ducati Diavel Service Manual: Reassembly of the seat
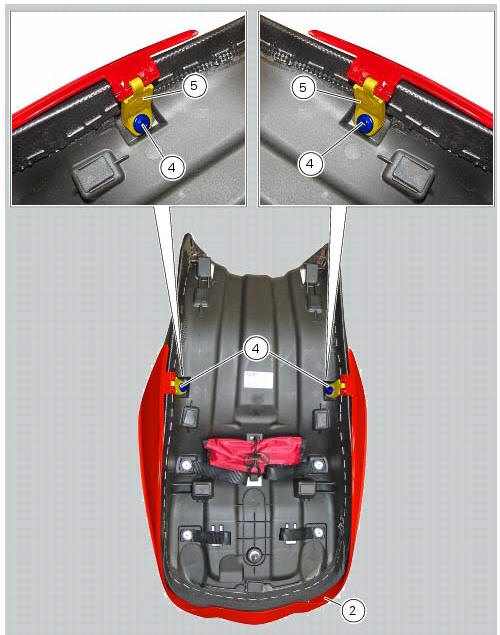
Place the seat cover (2) on the seat and fix it (on the lower side) by starting screws (4) on plates (5).
Tighten the screws (4) to a torque of 4 nm +/- 10% (sect. 3 - 3, Frame torque settings).
 Disassembly of the seat
Remove the seat and turn it upside down.
Loosen the special screws (4), turn the plates (5) and open the seat cover (2)
lateral sides to slide it out.
...
 Refitting the seat
Note
Apply recommended grease to the hole (a) of latch (6).
Fit the seat (1) as follows: insert the tabs (b) (on the front side) under
the rubber pads (c) of the gloves compartment;
then push ...
Other materials:
Indicator air - air temperature
This function shows the external temperature.
Display limits: -39C - +124C
In the event of a sensor fault (-40C, +125C or disconnected), a string of
dashes "- - -" (not flashing) is displayed and
the "vehicle/engine diagnosis - eobd" light comes on.
Note
When the vehicle is stopped, the ...
Lcd unit functions
Speedometer.
Gives road speed.
Rev counter.
Indicates engine revs per minute.
Clock.
Water temperature indicator.
Indicates engine coolant temperature.
Important
Stop riding if the temperature reaches the maximum
value, otherwise the engine might be damaged.
...
Low battery level
The activation of this (amber yellow) "warning" indicates that the status of
the battery vehicle is low.
It is activated when the battery voltage is ¼ 11.0 Volt.
Note
In this case, ducati recommends charging the battery as soon as possible
with the specific device, as it is possible th ...