
Ducati Diavel Service Manual: Refitting the cylinder head assemblies
Warning
To prevent oil leaks past the contact area between cylinders and crankcase, each time the head is removed, cylinder and piston must be removed as well to clean the mating faces of crankcase and cylinder and restore the spoiled gaskets and o-rings and apply again liquid sealant (sect. 9 - 5, Refitting the cylinder/piston assembly).
Before fitting the head, check that the seal is fitted on the mating surface between head and cylinder (sect. 9 - 5, Refitting the cylinder/piston assembly).
Note
When fitting the gasket, side (e) with the stamped code must be in contact with the cylinder head.
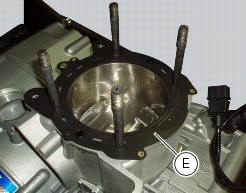
Lower the cylinder head carefully over the studs. Take care not to damage the threads.
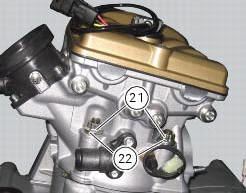
Fit the special washers (22) and nuts (21) onto the cylinder head studs.
Tighten the nuts (21) on the stud bolts evenly and gradually in a crosswise pattern using tool 88713.2676 In conjunction with a torque wrench.
Temporary tighten the nuts (21) to a torque of 20 nm; pre-tightening to a torque of 40 nm (min. 38 Nm - max. 48 Nm); one tightening to a torque of 60 nm (min. 57 Nm - max. 63 Nm) (sect. 3 - 3, Engine torque settings).
 Reassembly of the cylinder head
The exhaust side can be identified by the three threaded holes on the flange.
The intake side can be identified by the presence of four threaded holes on
the flange.
All the photos in this ...
 Cylinder/piston assemblies
Piston
Gudgeon pin circlip
Gudgeon pin
Set of piston rings
Cylinder-crankcase gasket
Water pump outlet union
Hose clip
Horizontal cylinder coolant inlet hose
Vertical cylinder c ...
Other materials:
Reassembling the frame and the lateral footrests
Apply the recommended grease to the thread of the pins (9) and of the nuts
(8).
Place the frame (1) and the brackets (2) and (3) on the engine block. Start the
pins (9) by holding the nuts (8) and insert
without tightening the screws (6) into the adjusters (4).
Position and fix the rear s ...
Testing the battery charging system
Note
The on-screen icons used during this procedure are explained in a table at
the end of this section.
You can determine the engine rpm required for generator to produce just
enough current to charge battery, feed the
injection ignition system and all electric items fitted to motorcycle. Wh ...
Using a multimeter to check the electrical systems
Introduction
This instrument allows you to measure resistance, voltages, and current
values. Multimeters can be divided into two basic
types: analogue and digital display multimeter. An analogue multimeter has a
pointer display. The dial is marked with the
scales to be used for measurement of ...