
Ducati Diavel Service Manual: Refitting the cylinder heads pulleys/fixed tensioners
Check that the keyway on the end of the camshaft is in good condition and without burrs.
Fit a woodruff key (b) in the keyway of each camshaft.
Fit the pulley (11) on the camshaft, inserting the woodruff key in the in the slot (c) in the pulley.
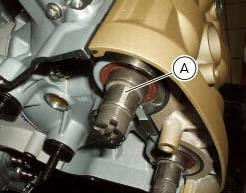
Apply the recommended grease to the threads on the end of the camshaft.
Repeat the procedure on the other camshaft.
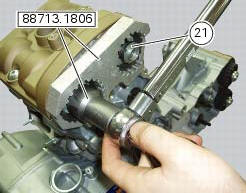
Insert the tool code 88713.1806 Into the pulleys to prevent rotation.
Apply the recommended grease to the mating face of the nut (21).
Fit the nut (21).
Carry out the same operations on the other camshaft.
Important
Always fit new nuts on reassembly.
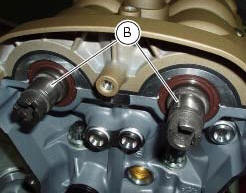
Using the bush supplied with tool with part no. 88713.1806 And a torque wrench, tighten the ring nuts (21) to the specified torque of 71 nm (min. 64 Nm - max. 78 Nm) (sect. 3 - 3, Engine torque settings).
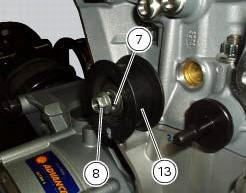
Insert the fixed tensioners (13), with bearings and washers (7), into the cylinder head pins and tighten the nuts (8) to a torque of 25 nm (min. 22 Nm - max. 28 Nm) (sect. 3 - 3, Engine torque settings).
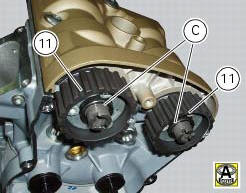
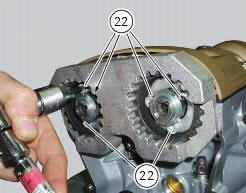
Undo the locking screws (22) of the pulleys, turning them anti-clockwise through 90 +/- 5.
Check that the pulleys have no end float and can rotate freely at all points along the full length of the slots.
 Reassembly of the timing pulleys
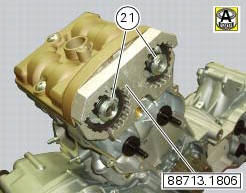
Fit the pulley (11) on the flange (24), aligning the timing mark (d) on the
pulley with the timing mark on the (e) on the
flange.
Install the washer (23) up against the pulley, aligning the timi ...
 Refitting the timing belts
Rotate the pulleys on the timing belt driveshaft until the timing mark on the
outer roller is aligned with the mark on the
clutch-side crankcase cover.
In this condition, the horizontal cylinder ...
Other materials:
Overhaul of the connecting rods
Make the following dimensional checks on the connecting rods:
Clearance with gudgeon pin on assembly.
In the event of excessive wear (sect. 3 - 1.1, Crankshaft), replace the
connecting rod.
The small end bushing must be in good condition and firmly driven into its seat.
Check for para ...
System components
Screw
Abs front speed sensor
Sealing washer
Hose grommet
Abs rear speed sensor
Abs control unit
Front pump - control unit pipe
Control unit - front callipers pipe
Rear pump - control unit pipe
Control unit - rear calliper pipe
Sealing washer
Support
Spacer
Rubber mou ...
Exhaust by-pass valve not working correctly
Fault codes
Dds: exvl diagnosis -> position error, potentiometer, short circuit to ground
or open circuit (s.C. Gnd or c.O.),
Potentiometer short circuited to vdc (potentiometer s.C vdc).
Dashboard: the error "exvl" (exhaust bypass valve) is shown on the service
display. The eobd warning ...