
Ducati Diavel Service Manual: Refitting the hands free
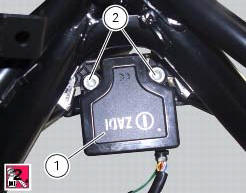
Reassembly is a reversal of the removal procedure: in particular apply prescribed threadlocker to screws (2) and tighten them to a torque of 20 nm +/- 10% (sect. 3 - 3, Frame torque settings).
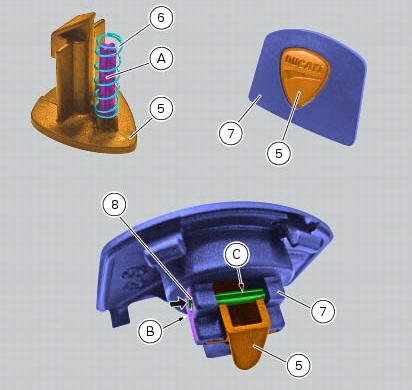
If the hands free button has been previously removed, when refitting it insert the spring (6) on pin (a) of button (5).
Introduce button (5) with spring (6) into the opening on the frame (7).
Lock the button (5) by means of a pin (8), by inserting it until reaching the surface (b) of the frame (7).
Note
Upon insertion of the pin (8), keep button (5) pressed in the direction indicated by the yellow arrow.
Warning
The opening (c) of the pin (8) must be on the opposite side of the of the surface touched by the button (5) when sliding (as shown in the figure).
To reposition the wiring refer to sect. 6 - 1, Routing of wiring on frame.
 Removing the hands free
Loosen the screws (2) and remove the hands free system (1) from the frame.
...
 Gearchange mechanism
Gearchange pedal
Bush
Rubber pad
Pin
O-ring
Gearchange lever tie-rod
Screw
Gearchange lever
Washer
Screw
Ball joint
Nut
Nut
Nut with left-hand thread
Lh ball joint
...
Other materials:
Ignition coils
Introduction
The engine control system of the diavel includes two ignition coils: one for
the horizontal cylinder and one for the vertical
cylinder. These coils are installed directly in the spark plug wells. A diode is
installed on the secondary winding inside the
coil, which prevents the un ...
Refitting the flywheel-alternator assembly
Fit the roller cage unit (20) with washer (18) and internal ring (19),
applying prescribed grease on the washer (18).
Install the roller cage assembly (20) with the washer (18) and inner race
(19).
Install the flywheel assembly (v) with the gear (21), aligning the notches as
shown in ...
Refitting the fuel tank
If the fuel tank has been disassembled into its component parts, reposition
all the parts as shown in the exploded view.
In particular:
tighten the screws (13) to a torque of 5 nm +/-10% (sect. 3 - 3, Frame torque
settings).
Refit the tank by inserting its rear side into the pin on the ...