
Ducati Diavel Service Manual: Refitting the intake manifold and coolant union
Apply prescribed threadlocker to the fitting (12), start it with seal (24) and tighten it to a torque of 2.5 Nm (min. 2 Nm - max. 3 Nm) (sect. 3 - 3, Frame torque settings).
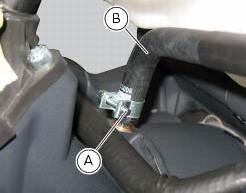
Install the pipe (b) and tighten the clamp (a) to the torque of 1 nm +/- 10% (sect. 3 - 3, Engine torque settings).

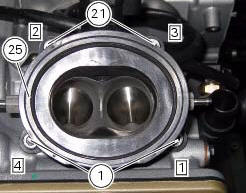
Check that the mating surfaces of the cylinder head and manifold are perfectly flat and clean and install the intake manifold (25) on the cylinder head.
Lock the fixing screws (21) to the torque of 10 nm (min. 9 Nm - max. 11 Nm) (sect. 3 - 3, Engine torque settings) in a cross-pattern sequence (1-2-3-4).
 Removal of the intake manifold and coolant union
Loosen the clips (f) and remove the hoses (t).
Remove the manifolds (25) undoing the screws (21).
Loosen the clamp (a) and remove the hose (b). Remove the union (12) and
recove ...
 Valves - rocker arms
Closing rocker arm shaft
Opening rocker arm shaft
Opening rocker arm
Closing rocker arm (left)
Valve opening shim
Half rings
Valve closing shim
Sealing ring
Valve guide
Exhaus ...
Other materials:
Refitting the rear suspension
Lubricate the thread and underside of the special screw (1).
Insert the lower side of the shock absorber into the swingarm and insert the
screw (1).
Tighten the screw (1) to a torque of 45 nm +/- 5% (sect. 3 - 3, Frame torque
settings).
Lubricate bushes (5) and (6) with recommended gr ...
Braking
Slow down in time, shift down to engine-brake first and then
brake applying both brakes. Pull the clutch lever before
stopping the motorcycle, to avoid sudden engine stop.
Abs system
Using the brakes correctly under adverse conditions is the
hardest – and yet the most critical - skill to mast ...
Solenoid starter
Remove the protection cover (a).
Undo the screws (2), taking care to collect the spring washers (3).
Remove the starter motor-solenoid cable (4) and the solenoid-battery cable (5).
Remove the starter solenoid (1) sliding it upwards.
Checking operation of the starter solenoid
To ...