
Ducati Diavel Service Manual: Refitting the rear sprocket
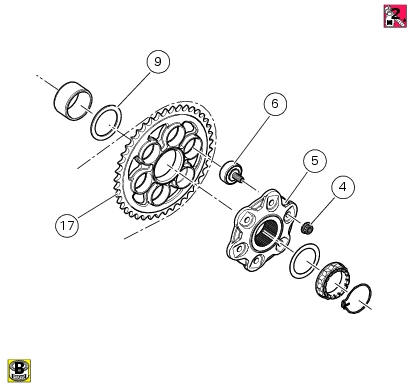
Check the cush drive bushes (6) condition and, if necessary, replace them by removing them from the flange.
Refitting is the reverse of removal.
Apply recommended grease on the rear sprocket flange (5) external diameter.
Place the rear sprocket flange (5) on sprocket (17) by inserting it on cush drive damper pins (6).
Apply prescribed threadlocker on the nut threads (4).
Start the nuts on the cush drive damper pins (6) threaded side.
Tighten the nuts (4) to a torque of 44 nm +/- 10% (sect. 3 - 3, Frame torque settings), following a cross-pattern sequence.
Check for wear following the instructions given at the beginning of this section.
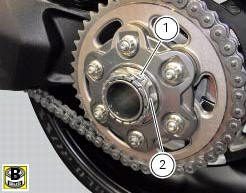
To refit the nut (2) follow the specifications for the wheel fixing nut, in sect. 7 - 2, Refitting the rear wheel.
Position the clip (1) as shown.

Washing the chain
Chains with o-rings must be washed in oil, diesel fuel or paraffin (kerosene).
Do not use fuel, trichloroethylene or other solvents which will damage the rubber o-rings. For the same reason use only sprays specifically formulated for use with o-ring chains.
 Replacing of the rear sprocket
Lock the wheel axle rotation.
Remove the clip (1).
Loosen the locking nut (2) with a socket wrench.
Fully unscrew the nut (2) and remove the washer (3) and the flange (5) with the
sproc ...
 Lubricating the chain
O-ring chains have sealed, life-lubed link studs and bushes. However, these
chains need lubricating at regular intervals to
protect metal parts of the chain and the o-rings.
Lubrication also ser ...
Other materials:
Operations to be carried out by the dealer
List of operations to be performed every 12000 km / year (first
limit reached)
Reading of the error memory with dds on the engine control units,
vehicle and abs
Change the engine oil
Change the engine oil filter
Check and/or adjust valve clearance ( ...
Disassembly of gear interlock plunger and pawl assembly
Unscrew the interlock plunger screw (5) and remove the seal (6), spring (7)
and the detent ball (8).
Unscrew the clutch-side crankcase half screw (3) and remove the pawl (4),
washer (2) and spring (1).
...
Abs disabled information not displayed
Fault codes
Dds: displays a fault code described in the description of the abs system.
Dashboard: no fault code displayed.
Wiring diagram
Checks
The abs fault indicator indicates the occurrence of one or more faults in the
antilock brake system, or if the system itself
has been disable ...