
Ducati Diavel Service Manual: Refitting the rear wheel
Lubricate the wheel shaft threaded end with prescribed grease.
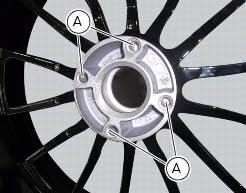
Insert the wheel shaft by matching (a) with pins (b).
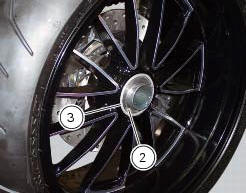
Install spacer (3) with the conical surface faced to the wheel conical surface, washer (2), apply prescribed grease to nut (1) and insert it by hand (1).
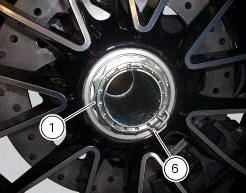
Tighten the nut (1) to a torque of 230 nm +/- 10% (sect. 3 - 3, Frame torque settings) checking that the hole on the nut is aligned with those in the wheel axle.
Fit the clip (6), inserting the end of one of the holes in the axle, orienting it a shown.
 Overhauling the rear wheel
Inspect the condition of the rear wheel.
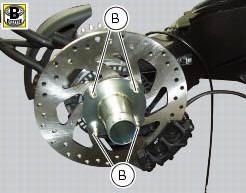
As the wheel rim has no bearings, it should be supported using the service tool
code 88713.2951.
Note
This service tool can also be used to install the ...
 Front brake control
Front brake master cylinder
Brake lever
Special screw
Sealing washer
Screw
Phonic wheel
Brake disc
Pin
Left brake calliper
Boot
Bleed valve
Spare stand
Control unit - fr ...
Other materials:
Injection relay
Introduction
The fuel pump, injectors and ignition coils are all powered via the injection
relay. The relay also sends voltage to the
engine control unit, which enables activation of the relay itself.
Component assembling position
A injection relay; b etv relay (throttle valve actuator mot ...
Refuelling
Never overfill the tank when refuelling. The fuel level should
always be below the rim of the filler recess.
Warning
Use low-lead fuel with 95 octane rating at origin
minimum (see "top-ups" table, page 173).
Check that no fuel is trapped in the filler cap recess.
...
Refitting the crankshaft/connecting rod assembly
Install the connecting rod assembly (6) and (2) in the crankcase, carry out
the shimming and crankcase half reassembly
procedure as described in sect. 9 - 9.2, Reassembly of the crankcase halves.
Important
Make sure that the connecting rods (2) are correctly positioned in the
cylinders. Incor ...