
Ducati Diavel Service Manual: Refitting the silencer
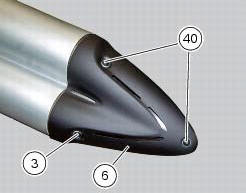
Position the silencer guard (41) and fix it by starting the screws (40).
Tighten the screws (40) to a torque of 8 nm +/- 10% (sect. 3 - 3, Frame torque settings).
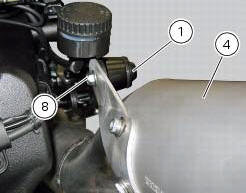
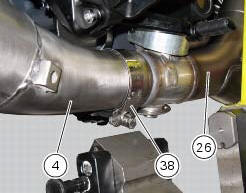
Insert the silencer (4) into the central exhaust pipe (26), and fix it to the vehicle by starting the screw (1).
Hold the nut (8) and tighten the screw (1) to a torque of 25 nm +/- 10% (sect. 3 - 3, Frame torque settings).
Orient and tighten the clamp (38) to a torque of 16 nm +/- 10% (sect. 3 - 3, Frame torque settings).
 Refitting the exhaust system
Refit the heat guard on the manifold (10) by tightening the nuts (9) to a
torque of 10 nm +/- 10% (sect. 3 - 3, Frame
torque settings).
Position the vertical exhaust manifold (22) on the verti ...
 Evaporative emissions canister
Sealing washer
Union
Hose clip
Hose
Clamp
"T" fitting
Hose
Support
Special screw
Rubber mounting
Hose
Hose clip
Evaporative emissions canister
Hose
Spring
Spare p ...
Other materials:
Reassembly of the tool tray
Place the tool tray unit (23) on the lateral brackets (2) and (3) by
tightening the screws (24) to 14 nm +/- 5% (sect. 3-3,
Frame torque settings).
If the handle guide (32) has been previously removed, position it on the tray
(23) and tighten the screws (34) to 20 nm
+/- 5% (sect. 3-3, Fram ...
Water radiators
Clip nut
Spacer
Vibration damper mount
Screw
Screw
Spacer
Vibration damper mount
Clip nut
Bush
Spacer
Rear sprocket
Screw
Water radiator (right)
Screw
Screw
Air deflector (right)
Special screw
Electro-fan
Screw
Vibration damper mount
Screw
Plug
Half ...
On-board computers and the can line
The following on-board computers make up the electrical system of the diavel
and are connected with each other via the
can line (or network):
Master dashboard
Slave dashboard
Hands free (facilitated keyless start system)
Ecu (engine control unit)
Bbs (black box system or central elect ...