
Ducati Diavel Service Manual: Refitting the throttle twistgrip
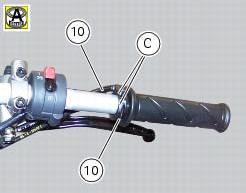
Lubricate the ends of the throttle grip cables (10) and the twistgrip race with the recommended grease.
The closing cable (10) features a writing on the yellow tube, whereas the opening one (10) features such writing on the white tube.
To refit the throttle control components, proceed in inverse order to the removal procedure, making sure that the twistgrip housings locate in the reference hole in the handlebar.
Tighten the screws (b) of throttle twistgrip (6) to a torque of 10 nm +/- 10% (sect. 3 - 3, Frame torque settings).

 Removal of the throttle twistgrip
Peel back the rubber sleeve (a) protecting the throttle control cables.
Undo the screws (b) of the throttle grip (6) and open the command.
Disconnect the throttle grip cables (10) by unhooking ...
 Hydraulic clutch control
Special screw
Sealing washer
Clutch master cylinder
Clutch hydraulic pipe (metal braid)
Screw
Spare stand
Washer
Microswitch
Pin
Bleed valve
Screw
Roller
O-ring
Clutch ...
Other materials:
Removing of the rear brake control
Warning
The brake master cylinder manufacturer advises against servicing the
brake master cylinder due to the safety critical
nature of this component.
Incorrect overhaul can endanger the rider and passenger.
Maintenance operations on these units are limited to renewal of the following
par ...
How to turn the motorcycle off
To turn the motorcycle off, turn the switch from "run on" to "run off". The
engine stops. To switch the dashboard off,
push the on/off switch downwards. When released, the switch automatically
returns to the "run off" position.
Push the switch downwards to switch the engine off and enter " ...
General safety rules
Carbon monoxide
When a maintenance operation must be performed with the engine running, maker
sure that the working area is wellventilated.
Never run the engine in an enclosed space.
Warning
Exhaust fumes contain carbon monoxide, which is a poisonous gas that
can cause unconsciousness or e ...