
Ducati Diavel Service Manual: Refitting the timing gears
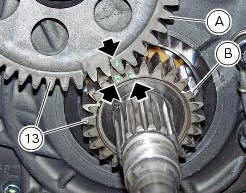
Before reassembling the removed parts, check timing gears (13) for wear. Change, if necessary.
Important
The timing gears (13) must always be renewed as a pair.
Refitting is the reverse of removal.
Warning
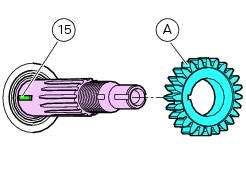
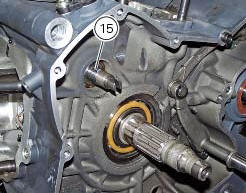
When introducing the driven gear (b) check that the tongue (15) is correctly fitted on the timing system shaft, align the gear slot with the tongue matching the driving gear timing mark (a) with the gear (b).
Important
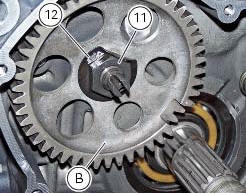
On completion of the refitting operations, check that tab washer (12) is staked against nut (11) in such a way as to prevent the nut from working loose.
 Removal of the timing gears
Slide out driving gear (a) of timing gear pair (13) and remove the woodruff
key (14).
Relieve the staking on the lock washer (12) of the nut (11).
Restrain the driven timing gear by ...
 Removal of the starter motor idler gear
Slide the gear pin (21) complete with the gear (19) and washer (20).
Warning
Pay attention to the washer (20) since it may fall inside the
crankcase half.
At this point, it is possibl ...
Other materials:
Indication of range reached for service
When service coupon threshold is achieved, upon every key-on the system
displays the indication of the type of
intervention that is required (oil service or desmo service).
The (red) warning is activated as a large icon for 10 seconds upon every key-on
(1) then as a small warning that
remai ...
Engine setting function (engine power control)
This function customises engine power and output.
To access the function it is necessary to view the ""setting" menu", using
buttons (1) "s" or (2) "t" select the "riding
mode" function and press the reset button (3) to enter the following page.
Use button (1) "s" or (2) "t" to select the r ...
Removal of the rear shock absorber
Loosen the screws (22) and remove the assembly (34) from the frame.
Loosen the screws (27) and remove the tank unit (s) of the shock absorber
from the support (19).
Hold the lh bush (6) and loosen the rh bush (5) to release the front side of
the shock absorber assembly.
Un ...