
Ducati Diavel Service Manual: Removal of the camshafts

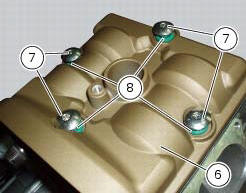
Unscrew and remove the screws (7) and the o-rings (8) from the cylinder head covers.
Remove the cylinder head cover (6).
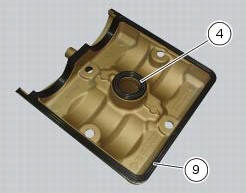
Remove the gaskets (4) and (9).
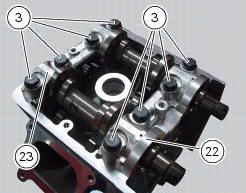
Repeat the same procedure for the other cylinder head cover. Unscrew the screws (3) securing the camshaft supports.
Withdraw the camshaft supports (22) and (23) straight out from the cylinder head, taking care not to damage the machined faces and locating dowels (11).
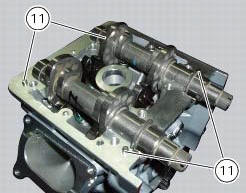
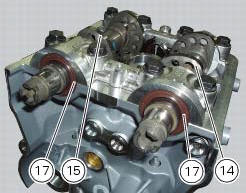
Remove the exhaust camshaft (14) and the intake camshaft (15), and slide off the sealing rings (17) on their ends.
Repeat the same procedure for the other cylinder head.
If necessary, unscrew the stud bolts (2) from the cylinder heads.

 Camshafts
Head
Stud bolt
Special screw
Sealing washer
Horizontal cylinder head cover
Vertical cylinder head cover
Special screw
O-ring
Head gasket
Screw
Pin
Union
Clamp
Horizont ...
 Checking the camshafts and supports
Check the cam contact surfaces for scratches, grooves, steps and waving.
Worn cams are frequently the cause of poor timing, which leads to loss of engine
power.
Place the camshaft between two ...
Other materials:
Adjusting the clutch lever and front brake lever
The clutch lever (1) is fitted with a span adjuster (2) which serves to alter
the distance of the lever from the handlebar.
The lever distance can be adjusted through 10 clicks of the dial (2). Turn
clockwise to increase lever distance. Turn the
adjuster counter clockwise to decrease lever d ...
How to turn the motorcycle off
To turn the motorcycle off, turn the switch from "run on" to "run off". The
engine stops. To switch the dashboard off,
push the on/off switch downwards. When released, the switch automatically
returns to the "run off" position.
Push the switch downwards to switch the engine off and enter " ...
Removal of the fuel tank
On the usa version remove the canister filter as indicated in sect. 8 - 10,
"Removal of the evaporative emissions
canister".
Loosen and remove the front retaining screw (4)
Remove the flange cover (a) by loosening the screws (b), disconnect the
quick-release fittings (c) from the fl ...